VueJs官网教程学习笔记
安装
- 兼容性:不支持IE8及以下版本浏览器;因为使用了IE8无法模拟的Object.defineProperty
- 开发版本->包含了完整的警告和调试模式
- CLI->可以构建一个完整的vue项目
介绍
- 是一套构建用户界面的框架,本身只关注视图层,但可以和第三方库结合来构建复杂的spa
Vue实例
构造器
Vue(选项对象)
123var vm = new Vue({// 选项});可扩展Vue构造器
12345var MyComponent = Vue.extend({// 扩展选项})// 所有的 `MyComponent` 实例都将以预定义的扩展选项被创建var myComponentInstance = new MyComponent()
属性与方法
- 每个vue实例会代理其
data对象里有所有属性,这些属性都是响应式的;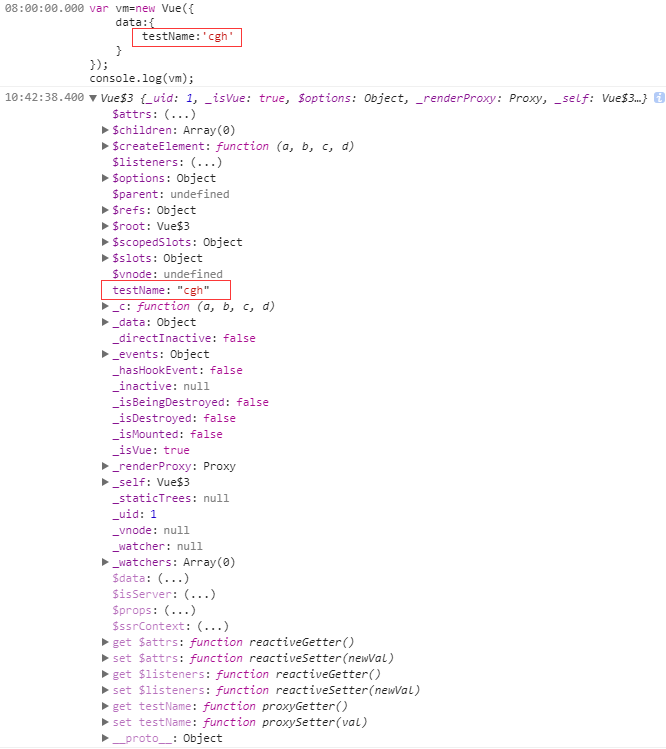
- $开头的为vue实例属性/方法
- 不要在实例属性或者回调函数中使用箭头函数,箭头函数会绑定上级context,this预期将不会是vue实例
- 每个vue实例会代理其
- 实例生命周期
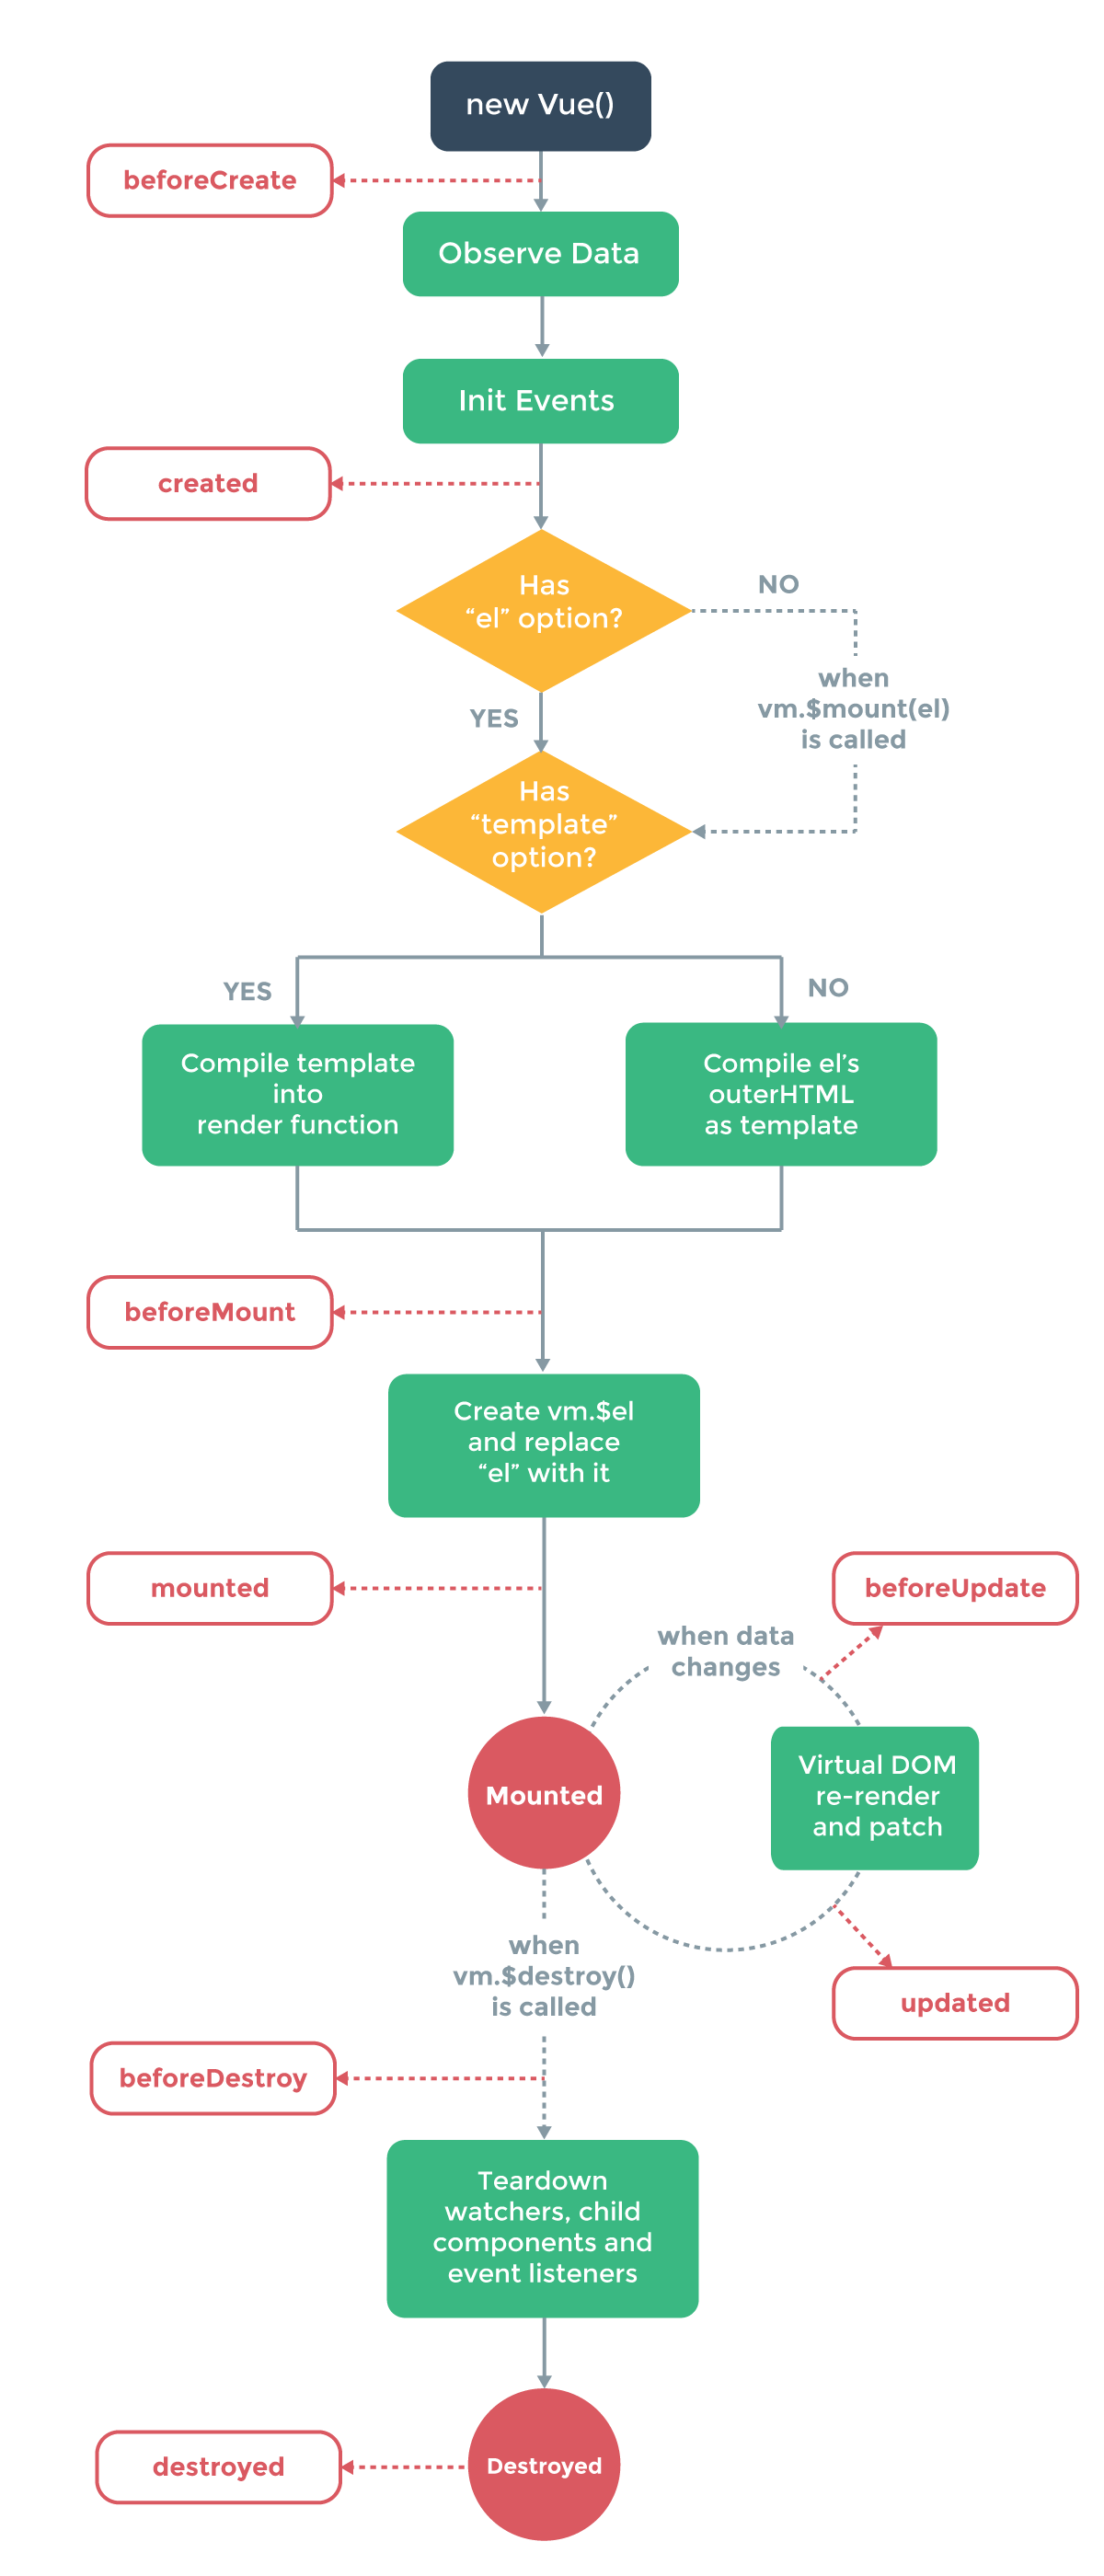
- 生命周期钩子->自定义事件
- 可以在选项对象中进行配置
- 生命周期钩子中的this指向实例化后的对象12345678910var vm = new Vue({data: {a: 1},created: function () {// `this` 指向 vm 实例console.log('a is: ' + this.a)}})// -> "a is: 1"
模板语法
插值
文本
- 绑定文本
v-text- 会将对应表达式求值后,当做字符串替换元素内的内容
- {{ msg }}
- msg 改变时,视图也会发生改变;是
v-text的简写,求值后,当做字符串替换 {{ }}处的内容;{{ }}中可以使用表达式,但不能使用语句,流程控制也不能用(使用三元表达式代替) - {{ }}形式会和ng中的一样,存在首次加载闪烁的问题,如果是首屏内容,可以尝试使用
v-text绑定
- msg 改变时,视图也会发生改变;是
- 一次性插值
- 在元素上使用
v-once指令,这样元素内部的所有数据绑定,只会显示第一次绑定时的数据,当数据发生变化时,它们都不会得到更新,可以用在不会发生改变的数据的绑定;1<span v-once>This will never change: {{ msg }},{{ test }}</span>
- 在元素上使用
- 绑定文本
纯html
v-html- {{ }}和
v-text会将数据当做纯文本处理,不会对其做html解析;v-html会将对应表达表达式当做html解析后,输出到元素内
- {{ }}和
- 属性(特性)
v-bind- 主要用来绑定特性
v-bind:title="test"将test绑定到元素的title特性上;
- 缩写
v-bind:href="url"->:href="url"
- 主要用来绑定特性
指令
- 指令是
v-开头(ng中以ng-开头),它的预期是一个单一js表达式(v-for除外) 可以带参数
12<a v-bind:href="url"></a><a v-on:click="doSomething">修饰符
- 指令后通过添加
.来附加修饰符(Modifiers),用于指出一个指令应该以特殊方式绑定。1<form v-on:submit.prevent="onSubmit"></form>// submit时阻止默认行为
- 指令后通过添加
过滤器
- vue2.0中没有预定义的过滤器了,所有filter都需要自定义
- 主要用在{{ }}和
v-bind中,达到格式化输出文本的作用 - 可级联使用
- 可带参数1234567891011121314151617181920//使用<!-- in mustaches -->{{ message | capitalize }}<!-- in v-bind --><div v-bind:id="rawId | formatId"></div>// 定义new Vue({// ...filters: {capitalize: function (value) {if (!value) return ''value = value.toString()return value.charAt(0).toUpperCase() + value.slice(1)}}})// 级联使用{{ message | filterA | filterB }}// 带参数{{ message | filterA('arg1', arg2) }}// 这里,filterA 是个拥有三个参数的函数。message 的值将会作为第一个参数传入。字符串 'arg1' 将作为第二个参数传给 filterA,表达式 arg2 的值将作为第三个参数。
缩写
v-bind
1234<!-- 完整语法 --><a v-bind:href="url"></a><!-- 缩写 --><a :href="url"></a>v-on
1234<!-- 完整语法 --><a v-on:click="doSomething"></a><!-- 缩写 --><a @click="doSomething"></a>
计算属性
计算属性
可以将计算属性当成data中属性添加了一个getter方法,并返回一个新属性,但新属性依赖data中的属性;
123456789101112131415// jsvar vm = new Vue({el: '#example',data: {message: 'Hello'},computed: {// a computed getterreversedMessage: function () {// `this` 指向vm实例,由于vm实例代理了所有data中的属性,所以this.message能被访问到return this.message.split('').reverse().join('')}}});// 当data中的message发生变化时,reversedMessage也会重新计算计算属性vsMethods
1<p>Reversed message: "{{ reversedMessage() }}"</p>123456methods: {reversedMessage: function () {return this.message.split('').reverse().join('')}}// 这样也能实现反转的效果- 不同点
- 计算属性是基于它们的依赖进行缓存的;如上面计算属性的例子,只要data中的message没有发生变化,computed中的reversedMessage都不会重新计算,每次访问reversedMessage都将会是之前缓存的数据;
- methods则不存在缓存一说,如上面methods例子,只要`
Reversed message: "{{ reversedMessage() }}"
`需要重新渲染,reversedMessage就会被重新调用并计算一次
- 不同点
计算setter
- 计算属性默认只有getter,可以提供setter方法12345678910111213141516// ...computed: {fullName: {// getterget: function () {return this.firstName + ' ' + this.lastName},// setterset: function (newValue) {var names = newValue.split(' ')this.firstName = names[0]this.lastName = names[names.length - 1]}}}// ...
- 计算属性默认只有getter,可以提供setter方法
watch
主要用来观测数据的变化,并进行一系列的操作
1234567<div id="watch-example"><p>Ask a yes/no question:<input v-model="question"></p><p>{{ answer }}</p></div>123456789101112131415161718192021222324252627282930313233343536373839404142434445464748<!-- Since there is already a rich ecosystem of ajax libraries --><!-- and collections of general-purpose utility methods, Vue core --><!-- is able to remain small by not reinventing them. This also --><!-- gives you the freedom to just use what you're familiar with. --><script src="https://unpkg.com/axios@0.12.0/dist/axios.min.js"></script><script src="https://unpkg.com/lodash@4.13.1/lodash.min.js"></script><script>var watchExampleVM = new Vue({el: '#watch-example',data: {question: '',answer: 'I cannot give you an answer until you ask a question!'},watch: {// 如果 question 发生改变,这个函数就会运行question: function (newQuestion) {this.answer = 'Waiting for you to stop typing...'this.getAnswer()}},methods: {// _.debounce 是一个通过 lodash 限制操作频率的函数。// 在这个例子中,我们希望限制访问yesno.wtf/api的频率// ajax请求直到用户输入完毕才会发出// 学习更多关于 _.debounce function (and its cousin// _.throttle), 参考: https://lodash.com/docs#debouncegetAnswer: _.debounce(function () {if (this.question.indexOf('?') === -1) {this.answer = 'Questions usually contain a question mark. ;-)'return}this.answer = 'Thinking...'var vm = thisaxios.get('https://yesno.wtf/api').then(function (response) {vm.answer = _.capitalize(response.data.answer)}).catch(function (error) {vm.answer = 'Error! Could not reach the API. ' + error})},// 这是我们为用户停止输入等待的毫秒数500)}})</script>
什么时候用computed、methods、watch
- computed主要用在根据原有属性,进行计算,返回新属性的操作;即适合用在对数据(属性)的set和get上
- methods主要用来编写一些通用,没有什么依赖的方法。
- watch主要用来观测数据(属性)的变化,当变化时进行一系列操作(异步操作或开销较大的操作)
- 总结
- computed适合用来对数据进行set、get
- watch适合用来在数据变化时,进行大开销的操作
- methods 用来编写通用的方法
Class与Style绑定
绑定 HTML Class
类似ng-class
对象语法
传一个对象,以动态切换class
1<div v-bind:class="{ active: isActive }"></div>// isActive为true时,则添加active样式类,为false则去除可以传多个属性,进行动态切换class;并v-bind:class可以和普通class属性共存
123<div class="static"v-bind:class="{ active: isActive, 'text-danger': hasError }"></div>可以直接绑定data里的一个对象
12345678<div v-bind:class="classObject"></div>// jsdata: {classObject: {active: true,'text-danger': false}}也可以绑定一个computed里的对象
1234567891011121314<div v-bind:class="classObject"></div>// jsdata: {isActive: true,error: null},computed: {classObject: function () {return {active: this.isActive && !this.error,'text-danger': this.error && this.error.type === 'fatal',}}}
数组语法
可以把数组传递给v-bind:class,以应用一个class列表
123456<div v-bind:class="[activeClass, errorClass]">// jsdata: {activeClass: 'active',errorClass: 'text-danger'}可以在数组中使用条件表达式
1<div v-bind:class="[isActive ? activeClass : '', errorClass]">可以在数组中使用对象语法
1<div v-bind:class="[{ active: isActive }, errorClass]">
绑定内联样式
类似ng-style
对象语法
- 直接绑定一个对象,CSS属性名用驼峰式(camelCase) 123456<div v-bind:style="{ color: activeColor, fontSize: fontSize + 'px' }"></div>// jsdata: {activeColor: 'red',fontSize: 30}
- 直接绑定一个对象,CSS属性名用驼峰式(camelCase)
数组语法
- v-bind:style 的数组语法可以将多个样式对象应用到一个元素上1<div v-bind:style="[baseStyles, overridingStyles]">
- v-bind:style 的数组语法可以将多个样式对象应用到一个元素上
多重值
- 从 2.3.0 起你可以为 style 绑定中的属性提供一个包含多个值的数组,常用于提供多个带前缀的值1<div :style="{ display: ['-webkit-box', '-ms-flexbox', 'flex'] }">
- 从 2.3.0 起你可以为 style 绑定中的属性提供一个包含多个值的数组,常用于提供多个带前缀的值
条件渲染
类似ng-if
v-if
条件为true时,则渲染,将元素添加到DOM中,为false,则将其从dom中删除
1<h1 v-if="ok">Yes</h1>条件渲染一组
- 可以将需要条件渲染的元素放到
<template>元素中,然后用v-if条件渲染12345<template v-if="ok"><h1>Title</h1><p>Paragraph 1</p><p>Paragraph 2</p></template>
- 可以将需要条件渲染的元素放到
v-else
可以使用v-else指令来表示v-if的”else块”
123456<div v-if="Math.random() > 0.5">Now you see me</div><div v-else>Now you don't</div>v-else元素必须紧跟在v-if或者v-else-if元素的后面——否则它将不会被识别
v-else-if
充当”else if块”;可链式调用
123456789101112<div v-if="type === 'A'">A</div><div v-else-if="type === 'B'">B</div><div v-else-if="type === 'C'">C</div><div v-else>Not A/B/C</div>类似于 v-else,v-else-if 必须紧跟在 v-if 或者 v-else-if 元素之后
用 key 管理可复用的元素
默认情况下,vue会尽可能的高效渲染元素,通常会复用已有元素而不是从头开始渲染。
123456789<template v-if="loginType === 'username'"><label>Username</label><input placeholder="Enter your username"></template><template v-else><label>Email</label><input placeholder="Enter your email address"></template>// 这里的input会被复用,并不会因为if和else而渲染两个,只是改变placeholder,这样效率更高有时,我们就是需要渲染两个,这是就需要使用
key;如上面例子,为这两个input分别添加一个唯一的key值时,切换时,vue就不会复用他们,而是重新渲染一个123456789<template v-if="loginType === 'username'"><label>Username</label><input placeholder="Enter your username" key="username-input"></template><template v-else><label>Email</label><input placeholder="Enter your email address" key="email-input"></template>// 注意, <label> 元素仍然会被高效地复用,因为它们没有添加 key 属性。
v-show
- 通过切换元素的display属性,元素会一直保留在DOM中,并不会因为为false,就把元素从DOM中删除,这点和
v-if不同
v-if和v-show
- v-if是通过增加、删除元素来达到显示/隐藏
- v-if 也是惰性的:如果在初始渲染时条件为假,则什么也不做——直到条件第一次变为真时,才会开始渲染条件块。
- v-show通过css切换(display属性)来显示/隐藏
- v-show不管初始条件是什么,元素总是会被渲染,并且只是简单地基于 CSS 进行切换。
- 一般来说, v-if 有更高的切换开销,而 v-show 有更高的初始渲染开销。因此,如果需要非常频繁地切换,则使用 v-show 较好;如果在运行时条件不太可能改变,则使用 v-if 较好。
v-if和v-for一起使用
- v-for 具有比 v-if 更高的优先级;先循环,再判断显示隐藏
列表渲染
v-for
数组迭代
12345678910111213141516<ul id="example-2"><li v-for="(item, index) in items">{{ parentMessage }} - {{ index }} - {{ item.message }}</li></ul>// jsvar example2 = new Vue({el: '#example-2',data: {parentMessage: 'Parent',items: [{ message: 'Foo' },{ message: 'Bar' }]}});渲染多个元素块->使用
<template>包裹123456<ul><template v-for="item in items"><li>{{ item.msg }}</li><li class="divider"></li></template></ul>对象迭代
- 在遍历对象时,是按 Object.keys() 的结果遍历,但是不能保证它的结果在不同的 JavaScript 引擎下是一致的。1234567891011121314<div v-for="(value, key, index) in object">{{ index }}. {{ key }} : {{ value }}</div>// jsnew Vue({el: '#repeat-object',data: {object: {firstName: 'John',lastName: 'Doe',age: 30}}});
- 在遍历对象时,是按 Object.keys() 的结果遍历,但是不能保证它的结果在不同的 JavaScript 引擎下是一致的。
整数迭代
1234<div><!-- span会重复10次 --><span v-for="n in 10">{{ n }} </span></div>v-for和v-if
当它们处于同一节点, v-for 的优先级比 v-if 更高,这意味着 v-if 将分别重复运行于每个 v-for 循环中。相当于在for循环中,再用if判断;
123<li v-for="todo in todos" v-if="!todo.isComplete">{{ todo }}</li>如果想条件判断了再循环,可以先if再for
12345<ul v-if="shouldRenderTodos"><li v-for="todo in todos">{{ todo }}</li></ul>
key
- vue默认会采取”就地复用”的策略,如果数据项的顺序被改变,Vue将不是移动 DOM 元素来匹配数据项的顺序, 而是简单复用此处每个元素,并且确保它在特定索引下显示已被渲染过的每个元素。
为了给 Vue 一个提示,以便它能跟踪每个节点的身份,从而重用和重新排序现有元素,你需要为每项提供一个唯一 key 属性。123<div v-for="item in items" :key="item.id"><!-- 内容 --></div>
建议尽可能使用 v-for 来提供 key ,除非迭代 DOM 内容足够简单,或者你是故意要依赖于默认行为来获得性能提升。
因为它是 Vue 识别节点的一个通用机制, key 并不特别与 v-for 关联,key 还具有其他用途,我们将在后面的指南中看到其他用途。
数组更新检测
- 变异方法
- 会改变原数组的方法都为变异方法push()、pop()、shift()、unshift()、splice()、sort()、reverse();所有变异方法(会改变原数组的方法)都会触发更新检测,若发现数组有变化,则会更新依赖它的地方
重塑数组
- 不会改变原数组的方法为非变异方法,非变异方法会返回一个新的数组;filter(), concat(), slice()都是非变异方法;当使用新返回的数组替换原先的数组时(重塑数组),不用担心vue会丢弃现有DOM重新渲染,vue会智能的复用DOM元素,123example1.items = example1.items.filter(function (item) {return item.message.match(/Foo/)});
- 不会改变原数组的方法为非变异方法,非变异方法会返回一个新的数组;filter(), concat(), slice()都是非变异方法;当使用新返回的数组替换原先的数组时(重塑数组),不用担心vue会丢弃现有DOM重新渲染,vue会智能的复用DOM元素,
注意
- 由于js的限制,vue不能检测下面变动的数组,将不会触发更新
- 当你利用索引直接设置一个项时,例如: vm.items[indexOfItem] = newValue
- 当你修改数组的长度时,例如: vm.items.length = newLength
解决方法
第一种问题,可以使用Vue.set或者splice方法
1234// Vue.setVue.set(example1.items, indexOfItem, newValue)// splice方法example1.items.splice(indexOfItem, 1, newValue)第二种问题可以使用splice
1example1.items.splice(newLength)
- 由于js的限制,vue不能检测下面变动的数组,将不会触发更新
显示过滤/排序结果
- 我们想要显示一个数组的过滤或排序副本,而不实际改变或重置原始数据。在这种情况下,可以创建返回过滤或排序数组的计算属性。123456789101112<li v-for="n in evenNumbers">{{ n }}</li>// jsdata: {numbers: [ 1, 2, 3, 4, 5 ]},computed: {evenNumbers: function () {return this.numbers.filter(function (number) {return number % 2 === 0})}}
事件处理器
监听事件
v-on使用
v-on监听事件1234<div id="example-1"><button v-on:click="counter += 1">增加 1</button><p>这个按钮被点击了 {{ counter }} 次。</p></div>缩写
v-on:click="xxx"->@click="xxx"
方法事件处理器
- 为事件指定一个处理函数123456789101112131415161718192021222324<div id="example-2"><!-- `greet` 是在下面定义的方法名 --><button v-on:click="greet">Greet</button></div>// jsvar example2 = new Vue({el: '#example-2',data: {name: 'Vue.js'},// 在 `methods` 对象中定义方法methods: {greet: function (event) {// `this` 在方法里指当前 Vue 实例alert('Hello ' + this.name + '!')// `event` 是原生 DOM 事件if (event) {alert(event.target.tagName)}}}})// 也可以用 JavaScript 直接调用方法example2.greet() // -> 'Hello Vue.js!'
- 为事件指定一个处理函数
内联处理器方法
直接将处理逻辑写在
v-on:click=之后1234<div id="example-3"><button v-on:click="say('hi')">Say hi</button><button v-on:click="say('what')">Say what</button></div>传递event给内联处理器需要使用$event
1234567891011<button v-on:click="warn('Form cannot be submitted yet.', $event)">Submit</button>// jsmethods: {warn: function (message, event) {// 现在我们可以访问原生事件对象if (event) event.preventDefault()alert(message)}}
事件修饰符
- 事件中经常需要调用event.preventDefault() 或 event.stopPropagation(),为了简化操作,也为了让处理函数中只有业务逻辑没有事件相关细节,所以vue在
v-on:上添加修饰符 .stop,.prevent,.capture,.self,.once1234567891011121314<!-- 阻止单击事件冒泡 --><a v-on:click.stop="doThis"></a><!-- 提交事件不再重载页面 --><form v-on:submit.prevent="onSubmit"></form><!-- 修饰符可以串联 --><a v-on:click.stop.prevent="doThat"></a><!-- 只有修饰符 --><form v-on:submit.prevent></form><!-- 添加事件侦听器时使用事件捕获模式 --><div v-on:click.capture="doThis">...</div><!-- 只当事件在该元素本身(比如不是子元素)触发时触发回调 --><div v-on:click.self="doThat">...</div><!-- 点击事件将只会触发一次 --><a v-on:click.once="doThis"></a>使用修饰符时,顺序很重要;相应的代码会以同样的顺序产生。因此,用 @click.prevent.self 会阻止所有的点击,而 @click.self.prevent 只会阻止元素上的点击。
- 事件中经常需要调用event.preventDefault() 或 event.stopPropagation(),为了简化操作,也为了让处理函数中只有业务逻辑没有事件相关细节,所以vue在
键值修饰符
Vue 允许为 v-on 在监听键盘事件时添加关键修饰符
123456<!-- 只有在 keyCode 是 13 时调用 vm.submit() --><input v-on:keyup.13="submit"><!-- 同上 --><input v-on:keyup.enter="submit"><!-- 缩写语法 --><input @keyup.enter="submit">按键别名
.enter,.tab,.delete(捕获“删除”和“退格”键),.esc,.space,.up,.down,.left,.right
- 可以通过全局 config.keyCodes 对象自定义键值修饰符别名12// 可以使用 v-on:keyup.f1Vue.config.keyCodes.f1 = 112
修饰键
.ctrl,.alt,.shift,.meta1234<!-- Alt + C --><input @keyup.alt.67="clear"><!-- Ctrl + Click --><div @click.ctrl="doSomething">Do something</div>滑鼠按键修饰符
.left,.right,.middle
表单控件绑定
基础用法
v-modelv-model可以实现表单控件的双向绑定;它会根据控件类型自动选取正确的方法来更新元素;类似ng-modelv-model会忽略所有表单元素的value、checked、selected特性的初始值。因为它会选择Vue实例数据来作为具体的值。应该通过data选项声明初始值。v-model在中文输入(IME)时不会更新,可以监听input事件
简单的表单
12345678<!-- 文本 --><input v-model="message" placeholder="edit me"><p>Message is: {{ message }}</p><!-- 多行文本 --><span>Multiline message is:</span><p style="white-space: pre-line">{{ message }}</p><br><textarea v-model="message" placeholder="add multiple lines"></textarea><!-- 在文本区域插值( <textarea></textarea> ) 并不会生效,应用 v-model 来代替 -->复选框
单个复选框,逻辑值
12<input type="checkbox" id="checkbox" v-model="checked"><label for="checkbox">{{ checked }}</label>多个复选框,
v-model需要绑定到同一个数组上123456789101112131415<input type="checkbox" id="jack" value="Jack" v-model="checkedNames"><label for="jack">Jack</label><input type="checkbox" id="john" value="John" v-model="checkedNames"><label for="john">John</label><input type="checkbox" id="mike" value="Mike" v-model="checkedNames"><label for="mike">Mike</label><br><span>Checked names: {{ checkedNames }}</span>// jsnew Vue({el: '...',data: {checkedNames: []}});
单选按钮
- 同一组,
v-model需要绑定到同一个数组上12345678910111213141516<div id="example-4"><input type="radio" id="one" value="One" v-model="picked"><label for="one">One</label><br><input type="radio" id="two" value="Two" v-model="picked"><label for="two">Two</label><br><span>Picked: {{ picked }}</span></div>// jsnew Vue({el: '#example-4',data: {picked: ''}});
- 同一组,
select
单选
12345678910<div id="example-5"><select v-model="selected"><option disabled value="">请选择</option><option>A</option><option>B</option><option>C</option></select><span>Selected: {{ selected }}</span></div>// 如果 v-model 表达初始的值不匹配任何的选项,<select> 元素就会以”未选中”的状态渲染。在 iOS 中,这会使用户无法选择第一个选项,因为这样的情况下,iOS 不会引发 change 事件。因此,像以上提供 disabled 选项是建议的做法。多选列表(绑定到一个数组)
12345678910111213141516<div id="example-6"><select v-model="selected" multiple style="width: 50px"><option>A</option><option>B</option><option>C</option></select><br><span>Selected: {{ selected }}</span></div>// jsnew Vue({el: '#example-6',data: {selected: []}});动态选项(使用
v-for渲染)123456789101112131415161718<select v-model="selected"><option v-for="option in options" v-bind:value="option.value">{{ option.text }}</option></select><span>Selected: {{ selected }}</span>// jsnew Vue({el: '...',data: {selected: 'A',options: [{ text: 'One', value: 'A' },{ text: 'Two', value: 'B' },{ text: 'Three', value: 'C' }]}});
绑定value
- 对于单选按钮,勾选框及选择列表选项, v-model 绑定的 value 通常是静态字符串(对于勾选框是逻辑值);但有时我们想绑定value到Vue实例的一个动态属性上
复选框
123456<input type="checkbox" v-model="toggle" v-bind:true-value="a" v-bind:false-value="b">// 当选中时vm.toggle === vm.a// 当没有选中时vm.toggle === vm.b单选按钮
123<input type="radio" v-model="pick" v-bind:value="a">// 当选中时vm.pick === vm.aselect
1234567<select v-model="selected"><!-- 内联对象字面量 --><option v-bind:value="{ number: 123 }">123</option></select>// 当选中时typeof vm.selected // -> 'object'vm.selected.number // -> 123
v-model的修饰符.lazy在默认情况下, v-model 在 input 事件中同步输入框的值与数据 (除了 上述 IME 部分),但你可以添加一个修饰符 lazy ,从而转变为在 change 事件中同步12<!-- 在 "change" 而不是 "input" 事件中更新 --><input v-model.lazy="msg" >.number如果想自动将用户的输入值转为 Number 类型(如果原值的转换结果为 NaN 则返回原值),可以添加一个修饰符 number 给 v-model 来处理输入值1<input v-model.number="age" type="number">.trim如果要自动过滤用户输入的首尾空格,可以添加 trim 修饰符到 v-model 上过滤输入1<input v-model.trim="msg">
组件
vue中的组件很类似ng1中的directive,通过自定义的html元素扩展功能
使用组件
注册
全局注册
123456789101112131415161718// Vue.component('组件名',选项对象 );// 选项对象和new Vue()中的几乎一样,只有个别属性使用不一样;//组件名建议使用kebab-case(短横线隔开式)连接,不要使用camelCased(驼峰式),因为html特性不区分大小写,类似ng1中的directive命名,为方便,同意使用kebab-case形式// Vue.component();不存在类似函数的声明提升机制,所以全局组件必须在根实例之前注册<div id="example"><my-component></my-component></div>// 注册->在创建根实例之前注册Vue.component('my-component', {template: '<div>A custom component!</div>' // template必须只有一个跟节点,类似ng1})// 创建根实例new Vue({el: '#example'});// 渲染为<div id="example"><div>A custom component!</div> // vue中自定义元素将直接被替换,类似ng1中定义指令时配置了replace:true</div>局部注册
- 通过使用组件选项对象中的components来注册,让其仅在一个实例/组件的作用域中可用12345678910var Child = {template: '<div>A custom component!</div>'};new Vue({el:'#test',components: {// <my-component> 将只在父模板可用(#test实例的范围中使用)'my-component': Child}});
- 通过使用组件选项对象中的components来注册,让其仅在一个实例/组件的作用域中可用
is在现有html上添加功能,类似ng1指令中的
restrict:A->因为html的限制,某些标签下只能出现特定的标签,出现其他标签视为无效,如select下只能是option;所以变通的方法是采用is特性12345678// 无效<table><my-row>...</my-row></table>// 有效<table><tr is="my-row"></tr></table>下来源之一的字符串模板,此限制将不适用:
<script type="text/x-template">- JavaScript 内联模版字符串
.vue组件
data必须是函数- 通过 Vue 构造器传入的各种选项大多数都可以在组件里用。
data是一个例外,它必须是函数,若不是函数,Vue将发出警告 - 如果通过
data函数返回一个对象(引用值),那么注册的所有组件都将共用这个对象1234567891011121314151617<div id="example-2"><simple-counter></simple-counter><simple-counter></simple-counter><simple-counter></simple-counter></div>var data = { counter: 0 };Vue.component('simple-counter', {template: '<button v-on:click="counter += 1">{{ counter }}</button>',// 技术上 data 的确是一个函数了,因此 Vue 不会警告,// 但是我们返回给每个组件的实例的却引用了同一个data对象data: function () {return data}});new Vue({el: '#example-2'});
- 通过 Vue 构造器传入的各种选项大多数都可以在组件里用。
父子组件如何通信
- props down, events up;
- 父组件通过子组件的props接口,将数据传递给子组件;子组件通过事件的形式给父组件发送消息
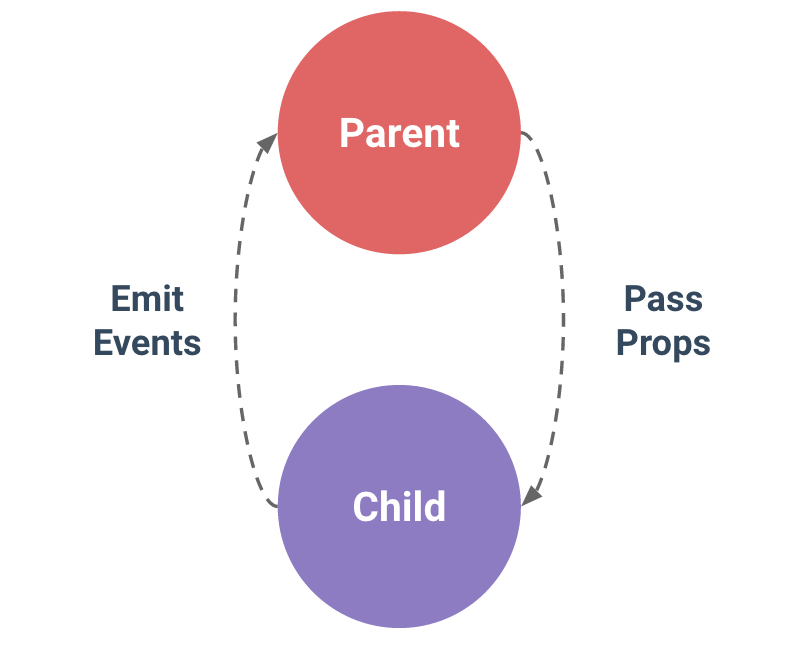
- 父组件通过子组件的props接口,将数据传递给子组件;子组件通过事件的形式给父组件发送消息
- props down, events up;
proprs
组件期望获得的数据,有点类似ng1指令中的scope属性
123456789Vue.component('child', {// 声明 propsprops: ['message'],// 就像 data 一样,prop 可以用在模板内// 同样也可以在 vm 实例中像“this.message”这样使用template: '<span>{{ message }}</span>'});// 通过child组件的message接口将数据传入<child message="hello!"></child>动态prop
在模板中,要动态地绑定父组件的数据到子模板的 props,与绑定到任何普通的HTML特性相类似,就是用 v-bind。每当父组件的数据变化时,该变化也会传导给子组件
12345<div><input v-model="parentMsg"><br><child v-bind:my-message="parentMsg"></child></div>用v-bind绑定的数据发生发生变化时,会将变化传导到子组件
123456789101112131415161718192021222324<div id="app"><child message='纯文本'></child><child message='test1'></child><child message='test2'></child><child v-bind:message='test2'></child></div><button>点击</button>var vm = new Vue({el: '#app',data: {test1: '我是变量1',test2: '我是变量2'},components: {'child': {props: ['message'],template: '<h1>{{message}}</h1>'}}});document.querySelector('button').onclick = function() {vm.test2 = '我是变量2,我被改变了';console.log(vm);};不要使用字面量形式传递数值,使用v-bind将其转化成表达式;下面例子,因为它是一个字面 prop,它的值是字符串 “1” 而不是 number。如果想传递一个实际的 number,需要使用 v-bind,从而让它的值被当作 JavaScript 表达式计算
1234<!-- 传递了一个字符串 "1" --><comp some-prop="1"></comp><!-- 传递实际的 number --><comp v-bind:some-prop="1"></comp>
单向数据流
- prop是单向的,只能父传递到子,反之则不行
- 父组件更新时,子组件的所有prop也将得到更新
遇到下面情况,可能需要修改prop中的数据
prop 作为初始值传入后,子组件想把它当作局部数据来用
- 解决方法
- 定义一个局部变量,并用 prop 的值初始化它1234props: ['initialCounter'],data: function () {return { counter: this.initialCounter }}
- 定义一个局部变量,并用 prop 的值初始化它
- 解决方法
prop 作为初始值传入,由子组件处理成其它数据输出
- 解决方法
- 定义一个计算属性,处理 prop 的值并返回123456props: ['size'],computed: {normalizedSize: function () {return this.size.trim().toLowerCase()}}
- 定义一个计算属性,处理 prop 的值并返回
- 解决方法
注意在 JavaScript 中对象和数组是引用类型,指向同一个内存空间,如果 prop 是一个对象或数组,在子组件内部改变它会影响父组件的状态。
prop验证
有时需要对传入组件的数据先进行验证再操作
12345678910111213141516171819202122232425262728293031Vue.component('example', {props: {// 基础类型检测 (`null` 意思是任何类型都可以)propA: Number,// 多种类型propB: [String, Number],// 必传且是字符串propC: {type: String,required: true},// 数字,有默认值propD: {type: Number,default: 100},// 数组/对象的默认值应当由一个工厂函数返回propE: {type: Object,// 注意是构造器,并不是字符串default: function () {return { message: 'hello' }}},// 自定义验证函数propF: {validator: function (value) {return value > 10}}}});验证时的type可以是:String、Number、Boolean、Function、Object、Array、Symbol
- 注意是构造器,不是字符串1234// 这样是错误的type:'Boolean'// 这样是对的type:Boolean
- 注意是构造器,不是字符串
当 prop 验证失败,Vue 会在抛出警告 (如果使用的是开发版本)。注意 props 会在组件实例创建之前进行校验,所以在 default 或 validator 函数里,诸如 data、computed 或 methods 等实例属性还无法使用。
非Prop属性
- 所谓非 prop 属性,就是它可以直接传入组件,而不需要定义相应的 prop。
- 明确给组件定义 prop 是传参的推荐方式
非prop属性,将会被自动添加到模板的根元素上
123456<!-- 有个非prop属性,data-3d-data-picker --><bs-date-input data-3d-date-picker="true"></bs-date-input><!-- bs-data-input的模板 --><input type="date" class="form-control"><!-- 渲染后 --><input type="date" class="form-control" data-3d-date-picker="true">替换/覆盖现有的特性
- 默认情况下,在发生特性冲突时,会采取覆盖策略,传递给组件的值会覆盖组件本身设定的值。即例如传递 type=”large” 将会覆盖 type=”date”
- class和style特性,在发生冲突时,会采取合并策略,而不是覆盖策略12345<bs-date-input type="num" data-3d-date-picker="true" class="date-picker-theme-dark"></bs-date-input><!-- 模板 --><input type="date" class="form-control"><!-- 渲染后,传进来的type覆盖了原先的type,class实现了合并 --><input type="num" class="form-control date-picker-theme-dark" data-3d-date-picker="true">
自定义事件
- 可以通过props向子组件传递数据,子组件可以通过自定义事件向父组件发消息
- 每个vue实例都实现了事件接口
- vm.$on(eventName)监听事件
- vm.$emit(eventName)触发事件
- 父组件可以在使用子组件的地方直接用
v-on来监听子组件触发的自定义事件,注意在子组件的自定义标签上直接使用v-on只能绑定子组件主动分发(通过$emit触发)的事件,这是一种特殊写法,告诉父组件要监听某个自定义事件。如果想直接使用v-on为子组件绑定事件,将无法触发;例子见下一小节 不能用 $on 侦听子组件抛出的事件,而必须在模板里直接用 v-on 绑定
12345678910111213141516171819202122232425262728293031323334353637<div id="counter-event-example"><p>{{ total }}</p><!-- 这里的v-on:increment="incrementTotal",其实在告诉父组件(这里是根实例)要监听increment事件了 --><button-counter v-on:increment="incrementTotal"></button-counter><button-counter v-on:increment="incrementTotal"></button-counter></div>// jsVue.component('button-counter', {template: '<button v-on:click="incrementCounter">{{ counter }}</button>',data: function () {return {counter: 0}},methods: {incrementCounter: function () {this.counter += 1;this.$emit('increment');// 分发'increment'自定义事件}},});new Vue({el: '#counter-event-example',data: {total: 0},methods: {incrementTotal: function () {// 接收到子组件分发'increment'自定义事件后触发this.total += 1}}});// 在v1版本中,子组件分发的自定义事件的触发函数是写在父组件的events中;// 这样写,有个不好的地方就是父组件不知道这个事件到底是哪个子组件分发的,如果多个子组件分发了同个自定义事件,就无法分辨。// 所以作者为了清晰的知道具体是哪个组件分发了事件,就将v-on移到了子组件的自定义标签上// https://v1.vuejs.org/guide/components.html#Custom-Events// https://segmentfault.com/q/1010000004486740/a-1020000004487413给组件绑定原生事件
- 有时候,你可能想在某个组件的根元素上监听一个原生事件。
- 注意:在子组件的自定义标签上直接使用v-on:mouseenter,这种事件是无法直接触发的(只有子组件主动$emit了mouseenter事件,才会触发),在子组件上直接使用
v-on绑定的只能是子组件主动分发的事件,它是在告诉父组件要监听某个自定义事件,是一种特殊写法; 想为某个组件绑定一个原生事件(在某个组件的根元素上监听一个原生事件),必须在自定义标签上使用
v-on:事件.native=xxx1234<!-- 这个mouseenter绑定的回调无法触发,除非子组件主动$emit了mouseenter,count才会被调用 --><button-counter v-on:child_increment="incrementTotal" v-on:mouseenter="count"></button-counter><!-- v-on:mouseenter.native这种写法,给button-counter的根标签绑定了一个原生mouseenter事件,鼠标移入,就会触发count --><button-counter v-on:child_increment="incrementTotal" v-on:mouseenter.native="count"></button-counter>小结
- 子组件的自定义标签上直接使用
v-on只适合子组件发消息给父组件这种情况,并且需要子组件主动$emit配合,经过这两步才能完成子组件给父组发消息,具体步骤如下- 子组件的自定义标签上直接使用
v-on:子组件主动分发的事件名=xxx - 子组件在条件合适时主动$emit(事件名)
- 子组件的自定义标签上直接使用
- 想在子组件自定义标签上直接使用
v-on给组件根元素绑定事件,必须添加.native修饰符
- 子组件的自定义标签上直接使用
双向绑定
.sync- 当一个子组件改变了一个 prop 的值时,这个变化也会同步到父组件中所绑定的值。123456<comp :foo.sync="bar"></comp><!-- 本质为下面的 --><comp :foo="bar" @update:foo="val => bar = val"></comp><!-- 子组件值变化时,主动触发update事件 -->this.$emit('update:foo', newValue)<!-- 其实这里的.sync也佐证了自定义标签上直接使用v-on绑定的事件,需要配合$emit才能触发 -->
- 当一个子组件改变了一个 prop 的值时,这个变化也会同步到父组件中所绑定的值。
v-modelv-model常用来针对表单实行双向数据绑定,它的本质是个语法糖;value属性+input事件123<input v-model="something"><!-- 本质如下 --><input v-bind:value="something" v-on:input="something = $event.target.value">创建自定义input组件时
12345678910111213141516171819202122232425262728293031323334353637<!-- 下面2种效果一样 --><currency-input v-model="price"></currency-input><currency-input v-bind:value="price" v-on:input="price = arguments[0]"></currency-input>Vue.component('currency-input', {template: '<span>$<input ref="input" v-bind:value="value" v-on:input="updateValue($event.target.value)"></span>',props: {value: Number},methods: {// 不是直接更新值,而是使用此方法来对输入值进行格式化和位数限制updateValue: function(value) {var formattedValue = value// 删除两侧的空格符.trim()// 保留 2 小数位.slice(0,value.indexOf('.') === -1 ?value.length :value.indexOf('.') + 3)// 如果值不统一,手动覆盖以保持一致if (formattedValue !== value) {this.$refs.input.value = formattedValue}// 通过 input 事件发出数值this.$emit('input', Number(formattedValue))}}});var vm = new Vue({el: '#app',data: {price: 3}});
定制
v-model- 从上节可知,
v-model需要使用到表单的value属性和input事件,但单选、复选之类的表单会把value用做别的目的;此时使用组件选项对象的model选项即可避免冲突1234567891011121314151617181920Vue.component('my-checkbox', {model: {// v-model使用checked属性和change事件完成双向绑定,而不用原来的value属性和input属性prop: 'checked',event: 'change'},props: {checked: Boolean,// this allows using the `value` prop for a different purpose,value属性可以用做其他用途value: String},// ...});<my-checkbox v-model="foo" value="some value"></my-checkbox><!-- 等价于 --><my-checkbox:checked="foo"@change="val => { foo = val }"value="some value"></my-checkbox>
- 从上节可知,
非父子组件通信
有时,非父子关系的组件也需要通信,这时需要一个中介来传递信息,在简单的场景下,可以使用一个空的 Vue 实例作为中央事件总线
1234567var bus = new Vue();// 触发组件 A 中的事件bus.$emit('id-selected', 1);// 在组件 B 创建的钩子中监听事件bus.$on('id-selected', function (id) {// ...});案例
123456789101112131415161718192021222324252627282930313233343536373839404142434445464748<div id="app"><my-num :init-num="price"></my-num><my-div></my-div></div>Vue.component('my-num', {template: '<input type="num" v-model="num" @input="numChanged">',props: {'initNum': {type: Number}},data: function() {return {num: this.initNum};},methods: {numChanged: function() {console.log(this.num);bus.$emit('my-num-change', this.num); // 通过bus触发my-num-change}}});Vue.component('my-div', {template: '<h1>{{text}}</h1>',data: function() {return {text: '我将展示上面input的内容'};},created: function() { // 创建后var _self = this;bus.$on('my-num-change', function(str) { // 监听my-num-change事件_self.text = str;});}});var bus = new Vue();var vm = new Vue({el: '#app',data: {price: 3}});
使用Slot分发内容
类似ng1中指令的transclude,用来混合父组件的内容和子组件的模板
编译作用域
- 父组件模板的内容在父组件作用域内编译;子组件模板的内容在子组件作用域内编译。1234567891011121314151617181920212223242526272829// message将在父组件/实例的作用域中编译,因为{{message}}实际是在父组件模板的内容中,而不是在子组件的模板内容中<child-component>{{ message }}</child-component>// 下例{{test}}、{{test2}}都将在根实例的作用域下编译<div id="app"><parent-comp>{{test}}<br><child-comp>{{test2}}</child-comp></parent-comp></div>// 假设someChildProperty是子组件上的属性,下面例子无效,将在父组件/实例的作用域中查找someChildProperty,你必须在child-component作用域中使用someChildProperty<child-component v-show="someChildProperty"></child-component>// 下面有效Vue.component('child-component', {// 有效,因为是在正确的作用域内template: '<div v-show="someChildProperty">Child</div>',data: function () {return {someChildProperty: true}}});
- 父组件模板的内容在父组件作用域内编译;子组件模板的内容在子组件作用域内编译。
分发内容
- 父组件/实例中嵌套在子组件自定义便签中的内容都称为分发内容
- 分发内容是在父作用域内编译
- 分发内容适合混合/嵌套多个组件时使用1234<!-- {{message}}属于分发内容,他将在child-component的父作用域中编译 --><child-component>{{ message }}</child-component>
slot- 除非子组件模板包含至少一个
<slot>插口,否则父组件的内容将会被丢弃。类似ng1中directive模板中会指定一个标签,添加ng-transclude特性一样,这个标签将接收在父作用域中编译好的分发内容 - 当子组件模板只有一个没有属性的slot时,父组件整个内容片段将插入到slot所在的DOM位置,并替换掉slot标签本身
- 最初在
标签中的任何内容都被视为备用内容。备用内容在子组件的作用域内编译,并且只有在宿主元素为空,且没有要插入的内容时才显示备用内容。 12345678910111213141516171819202122232425// 父组件模板<div><h1>我是父组件的标题</h1><my-component><p>这是一些初始内容</p><p>这是更多的初始内容</p></my-component></div>// 子组件my-component的模板<div><h2>我是子组件的标题</h2><slot>只有在没有要分发的内容时才会显示。<slot>整个标签将被分发内容替换</slot></div>// 渲染后<div><h1>我是父组件的标题</h1><div><h2>我是子组件的标题</h2><!-- 下面是分发内容替换了<slot> --><p>这是一些初始内容</p><p>这是更多的初始内容</p></div></div>
- 除非子组件模板包含至少一个
具名
slot<slot>元素可以用一个特殊的属性 name 来配置如何分发内容。多个 slot 可以有不同的名字。具名 slot 将匹配内容片段中有对应 slot 特性的元素- 仍然可以有一个匿名 slot,它是默认 slot,作为找不到匹配的内容片段的备用插槽。如果没有默认的 slot,这些找不到匹配的内容片段将被抛弃。
- 子组件模板上有个
<slot>标签,通过标签上的name属性来给<slot>起个名字,分发内容上有个slot特性,通过这个slot特性的值找到子组件中对应名字的<slot>标签,并用分发内容将其替换掉。1234567891011121314151617181920212223242526272829303132// app-layout组件<div class="container"><header><slot name="header"></slot> // 这里将要放名字为header的分发内容</header><main><slot></slot>// 这里将要找不到匹配的分发内容</main><footer><slot name="footer"></slot>// 这里将要放名字为footer的分发内容</footer></div>// 父组件模板<app-layout>// 这里面的都是分发内容<h1 slot="header">这里可能是一个页面标题</h1> // 这个将放到header的slot中<p>主要内容的一个段落。</p><p>另一个主要段落。</p><p slot="footer">这里有一些联系信息</p>// 这个将放到footer的slot中</app-layout>// 渲染后<div class="container"><header><h1>这里可能是一个页面标题</h1></header><main><p>主要内容的一个段落。</p><p>另一个主要段落。</p></main><footer><p>这里有一些联系信息</p></footer></div>
作用域插槽(Scoped Slot)
- 正常情况下,分发内容是在父组件的作用域中编译的;考虑下面情况:我们需要创建一个组件,能使用同一份数据,根据DOM的不同渲染出不一样的界面;同一个组件,有不同的DOM结构,我们肯定不能将DOM结构固死在组件内部,肯定需要外部传入,我们很快就想到需要使用分发内容和Slot来完成,但这样会出现一个问题。我们的DOM结构是通过分发内容传入组件内部的,但是分发内容在传入子组件时,已经在父组件的作用域中编译过了,也就是说它用的数据是父组件的而不是子组件的。Scoped Slot就能解决这一问题,它能让分发内容在传入子组件前使用子组件的数据;以前分发内容只能在父组件作用域中编译,根本无法使用到子组件的数据,现在使用Scoped Slot能实现分发内容使用子组件的数据编译。这样能提高组件的复用性。
- 如何使用
- 在子组件模板
<slot>标签上绑定需要暴露的数据(提供给父组件使用的数据),这些数据会被封装到一个对象上,传递给父级 - 在父级上,必须有一个包含
scope属性的<template>元素,表示它是作用域插槽的模板 scope的值对应一个临时变量名,此变量接收从子组件中传递过来的对象
- 在子组件模板
- 实际例子
- 现在要实现一个列表组件,可以让用户自定义DOM结构12345678910111213141516171819202122232425262728293031<div id="app"><my-awesome-list :items="items"><!-- 作用域插槽也可以是具名的,componProp就是子组件传递过来的对象 --><template slot="list-item" scope="componProp"><!-- 这里我可以使用任意的结构来渲染list --><!-- <h1>{{ componProp.text }}</h1> --><div style="font-style: italic;">{{ componProp.text }}</div></template></my-awesome-list></div>Vue.component('my-awesome-list', {props: {items: {type: Array,required: true}},template: '<div><slot name="list-item" v-for="item in items" :text="item.text"></slot></div>'// 暴露text给分发内容使用});var vm = new Vue({el: '#app',data: {items: [{text: '11111'}, {text: '22222'}]}});
- 现在要实现一个列表组件,可以让用户自定义DOM结构
动态组件
通过使用保留的
元素,动态地绑定到它的 is 特性,我们让多个组件可以使用同一个挂载点,并动态切换 123456789101112131415<component v-bind:is="currentView"><!-- 组件在 vm.currentview 变化时改变! --></component>var vm = new Vue({el: '#example',data: {currentView: 'home'},components: {home: { /* ... */ },posts: { /* ... */ },archive: { /* ... */ }}});也可以直接绑定到组件对象上
123456789var Home = {template: '<p>Welcome home!</p>'}var vm = new Vue({el: '#example',data: {currentView: Home}})动态组件配合使用
<keep-alive>来缓存非活动组件,避免重新渲染12345<keep-alive><component :is="currentView"><!-- 非活动组件将被缓存! --></component></keep-alive>
杂项
- 编写可复用组件
- Props 允许外部环境传递数据给组件
- Events 允许从外部环境在组件内触发副作用
- Slots 允许外部环境将额外的内容组合在组件中
子组件索引
尽管有 props 和 events,但是有时仍然需要在 JavaScript 中直接访问子组件。为此可以使用 ref 为子组件指定一个索引 ID
123456<div id="parent"><user-profile ref="profile"></user-profile></div>var parent = new Vue({ el: '#parent' });// 访问子组件var child = parent.$refs.profile当 ref 和 v-for 一起使用时,ref 是一个数组,包含相应的子组件
- $refs 只在组件渲染完成后才填充,并且它是非响应式的。它仅仅作为一个直接访问子组件的应急方案——应当避免在模版或计算属性中使用 $refs。
异步组件
在大型应用中,我们可能需要将应用拆分为多个小模块,按需从服务器下载。为了让事情更简单,Vue.js 允许将组件定义为一个工厂函数,动态地解析组件的定义。Vue.js 只在组件需要渲染时触发工厂函数,并且把结果缓存起来,用于后面的再次渲染。
12345678Vue.component('async-example', function (resolve, reject) {setTimeout(function () {// Pass the component definition to the resolve callbackresolve({template: '<div>I am async!</div>'})}, 1000)})工厂函数接收一个 resolve 回调,在收到从服务器下载的组件定义时调用。也可以调用 reject(reason) 指示加载失败。这里 setTimeout 只是为了演示。怎么获取组件完全由你决定。推荐配合使用 :Webpack 的代码分割功能
123456Vue.component('async-webpack-example', function (resolve) {// 这个特殊的 require 语法告诉 webpack// 自动将编译后的代码分割成不同的块,// 这些块将通过 Ajax 请求自动下载。require(['./my-async-component'], resolve)})你可以使用 Webpack 2 + ES2015 的语法返回一个 Promise resolve 函数
1234Vue.component('async-webpack-example',() => import('./my-async-component'))当使用局部注册时,你也可以直接提供一个返回 Promise 的函数
123456new Vue({// ...components: {'my-component': () => import('./my-async-component')}})如果你是 Browserify 用户,可能就无法使用异步组件了,它的作者已经表明 Browserify 是不支持异步加载的。Browserify 社区发现 一些解决方法,可能有助于已存在的复杂应用。对于其他场景,我们推荐简单实用 Webpack 构建,一流的异步支持
高级异步组件
自 2.3.0 起,异步组件的工厂函数也可以返回一个如下的对象
123456789101112const AsyncComp = () => ({// 需要加载的组件. 应当是一个 Promisecomponent: import('./MyComp.vue'),// loading 时应当渲染的组件loading: LoadingComp,// 出错时渲染的组件error: ErrorComp,// 渲染 loading 组件前的等待时间。默认:200ms.delay: 200,// 最长等待时间。超出此时间则渲染 error 组件。默认:Infinitytimeout: 3000})注意,当一个异步组件被作为 vue-
- 的路由组件使用时,这些高级选项都是无效的,因为在路由切换前就会提前加载所需要的异步组件。另外,如果你要在路由组件中使用上述写法,需要使用
- 2.4.0+。
- 组件命名约定
- 注册组件 (或者 props) 时,可以使用 kebab-case(短横线连接),camelCase,或 PascalCase
- 在 HTML 模版中,使用组件推荐 kebab-case 形式
- 递归组件
- 组件在它的模板内可以递归地调用自己,不过,只有当它有 name 选项时才可以
- 当你利用Vue.component全局注册了一个组件, 全局的ID作为组件的 name 选项,被自动设置.局部注册需要手动设置
- 递归时,一定要设置终止条件
组件间的循环引用
- 假设你正在构建一个文件目录树,像在Finder或文件资源管理器中。你可能有一个 tree-folder组件12345678910111213// tree-folder组件<p><span>{{ folder.name }}</span><tree-folder-contents :children="folder.children"/></p>// 然后 一个tree-folder-contents组件<ul><li v-for="child in children"><tree-folder v-if="child.children" :folder="child"/><span v-else>{{ child.name }}</span></li></ul>// 当你仔细看时,会发现在渲染树上这两个组件同时为对方的父节点和子节点–这点是矛盾的。当使用Vue.component将这两个组件注册为全局组件的时候,框架会自动为你解决这个矛盾
- 假设你正在构建一个文件目录树,像在Finder或文件资源管理器中。你可能有一个 tree-folder组件
内联模版
如果子组件有 inline-template 特性,组件将把它的内容当作它的模板,而不是把它当作分发内容
123456<my-component inline-template><div><p>These are compiled as the component's own template.</p><p>Not parent's transclusion content.</p></div></my-component>但是 inline-template 让模板的作用域难以理解。最佳实践是使用 template 选项在组件内定义模板或者在 .vue 文件中使用 template 元素
X-Templates
另一种定义模版的方式是在 JavaScript 标签里使用 text/x-template 类型,并且指定一个 id
123456<script type="text/x-template" id="hello-world-template"><p>Hello hello hello</p></script>Vue.component('hello-world', {template: '#hello-world-template'})这在有很多模版或者小的应用中有用,否则应该避免使用,因为它将模版和组件的其他定义隔离了。
- 对低开销的静态组件使用 v-once
- 尽管在 Vue 中渲染 HTML 很快,不过当组件中包含大量静态内容时,可以考虑使用 v-once 将渲染结果缓存起来,就像这样12345678Vue.component('terms-of-service', {template: '\<div v-once>\<h1>Terms of Service</h1>\... a lot of static content ...\</div>\'})
- 尽管在 Vue 中渲染 HTML 很快,不过当组件中包含大量静态内容时,可以考虑使用 v-once 将渲染结果缓存起来,就像这样
深入响应式原理
如何追踪变化
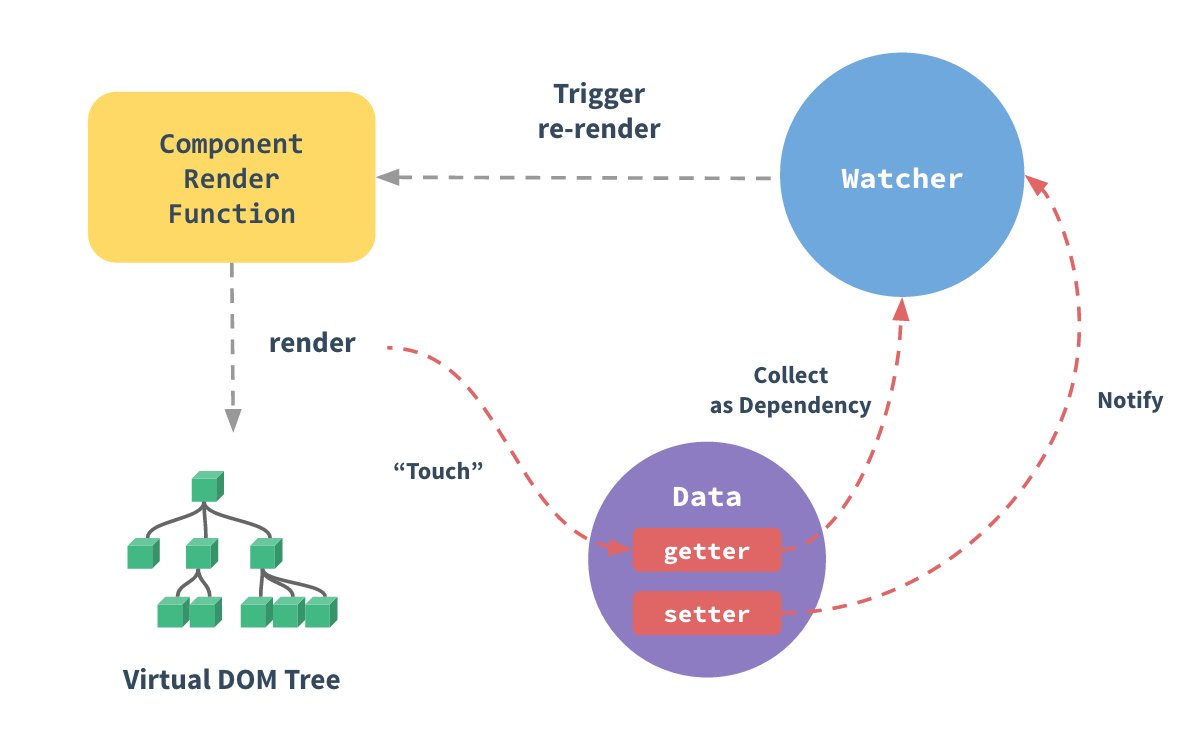
- Vue通过
Object.defineProperty将属性转化为setter/getter,在setter/getter中进行依赖追踪- 把一个普通 JavaScript 对象传给 Vue 实例的 data 选项,Vue 将遍历此对象所有的属性,并使用 Object.defineProperty 把这些属性全部转为 getter/setter。
- 用户看不到 getter/setter,但是在内部它们让 Vue 追踪依赖,在属性被访问和修改时通知变化
- 每个组件实例都有相应的 watcher 实例对象,它会在组件渲染的过程中把属性记录为依赖,之后当依赖项的 setter 被调用时,会通知 watcher 重新计算,从而致使它关联的组件得以更新
变化检测问题
受现代 JavaScript 的限制(以及废弃 Object.observe),Vue 不能检测到对象属性的添加或删除。由于 Vue 会在初始化实例时对属性执行 getter/setter 转化过程,所以属性必须在 data 对象上存在才能让 Vue 转换它,这样才能让它是响应的
12345678var vm = new Vue({data:{a:1}})// `vm.a` 是响应的vm.b = 2// `vm.b` 是非响应的可以使用
Vue.set(target,key,value)或者vm.$set(target,key,value)来添加响应式属性;注意target不能是 Vue 实例,或者 Vue 实例的根数据对象- 有时你想向已有对象上添加一些属性,例如使用 Object.assign() 或 _.extend() 方法来添加属性。但是,添加到对象上的新属性不会触发更新。在这种情况下可以创建一个新的对象,让它包含原对象的属性和新的属性12// 代替 `Object.assign(this.someObject, { a: 1, b: 2 })`this.someObject = Object.assign({}, this.someObject, { a: 1, b: 2 })
声明响应式属性
- 由于 Vue 不允许动态添加根级响应式属性,所以你必须在初始化实例前声明根级响应式属性,哪怕只是一个空值123456789var vm = new Vue({data: {// 声明 message 为一个空值字符串message: ''},template: '<div>{{ message }}</div>'})// 之后设置 `message`vm.message = 'Hello!'
异步更新队列
- Vue中的DOM更新是异步的;实际的DOM更新是发生在观察到数据变化后下一个eventLoop的tick中
- 只要观察到数据变化,Vue 将开启一个队列,并缓冲在同一事件循环中发生的所有数据改变。如果同一个 watcher 被多次触发,只会一次推入到队列中。这种在缓冲时去除重复数据对于避免不必要的计算和 DOM 操作上非常重要。然后,在下一个的事件循环“tick”中,Vue 刷新队列并执行实际(已去重的)工作。(数据变化->开启队列->去重复/缓冲)->(DOM更新),在同一个括号中,代表发生在同一个tick中
- Vue 在内部尝试对异步队列使用原生的 Promise.then 和 MutationObserver,如果执行环境不支持,会采用 setTimeout(fn, 0) 代替。例如,当你设置 vm.someData = ‘new value’ ,该组件不会立即重新渲染。当刷新队列时,组件会在事件循环队列清空时的下一个“tick”更新。
可以使用
Vue.nextTick(callback),在 DOM 更新完成后立即调用callback123456789101112<div id="example">{{message}}</div>var vm = new Vue({el: '#example',data: {message: '123'}})vm.message = 'new message' // 更改数据vm.$el.textContent === 'new message' // falseVue.nextTick(function () {vm.$el.textContent === 'new message' // true})组件内使用
vm.$nextTick(callback),callback中的 this 将自动绑定到当前的 Vue 实例上1234567891011121314151617Vue.component('example', {template: '<span>{{ message }}</span>',data: function () {return {message: '没有更新'}},methods: {updateMessage: function () {this.message = '更新完成'console.log(this.$el.textContent) // => '没有更新'this.$nextTick(function () {console.log(this.$el.textContent) // => '更新完成'})}}})
过渡效果
单元素/组件的过渡
Vue 提供了 transition 的封装组件,在下列情形中,可以给任何元素和组件添加 entering/leaving 过渡
- 条件渲染 (使用 v-if)
- 条件展示 (使用 v-show)
- 动态组件
组件根节点
12345678910111213141516171819202122<div id="demo"><button v-on:click="show = !show">Toggle</button><transition name="fade"><p v-if="show">hello</p></transition></div>.fade-enter-active, .fade-leave-active {transition: opacity 0.5s}.fade-enter, .fade-leave-to {opacity: 0}new Vue({el: '#demo',data: {show: true}});当插入或删除包含在
<transition>组件中的元素时,Vue 将会做以下处理- 自动嗅探目标元素是否应用了 CSS 过渡或动画,如果是,在恰当的时机添加/删除 CSS 类名。
- 如果过渡组件提供了 JavaScript 钩子函数,这些钩子函数将在恰当的时机被调用
- 如果没有找到 JavaScript 钩子并且也没有检测到 CSS 过渡/动画,DOM 操作(插入/删除)在下一帧中立即执行。(注意:此指浏览器逐帧动画机制,和Vue的 nextTick 概念不同)
过渡的css类名
类似ng中动画会添加合适的class
- 会有 6 个(CSS)类名在 enter/leave 的过渡中切换
v-enter->定义开始状态,会在元素插入时生效,并在下一frame被删除v-enter-active->定义过渡状态,插入时生效,过渡结束时删除;这个可以被用来定义过渡的过程时间,延迟和曲线函数。v-enter-to->定义过渡结束状态,在元素插入后的下一frame被加入(v-enter正好删除),过渡结束时删除- 同理,
leave也一样,有v-leave、v-leave-active、v-leave-to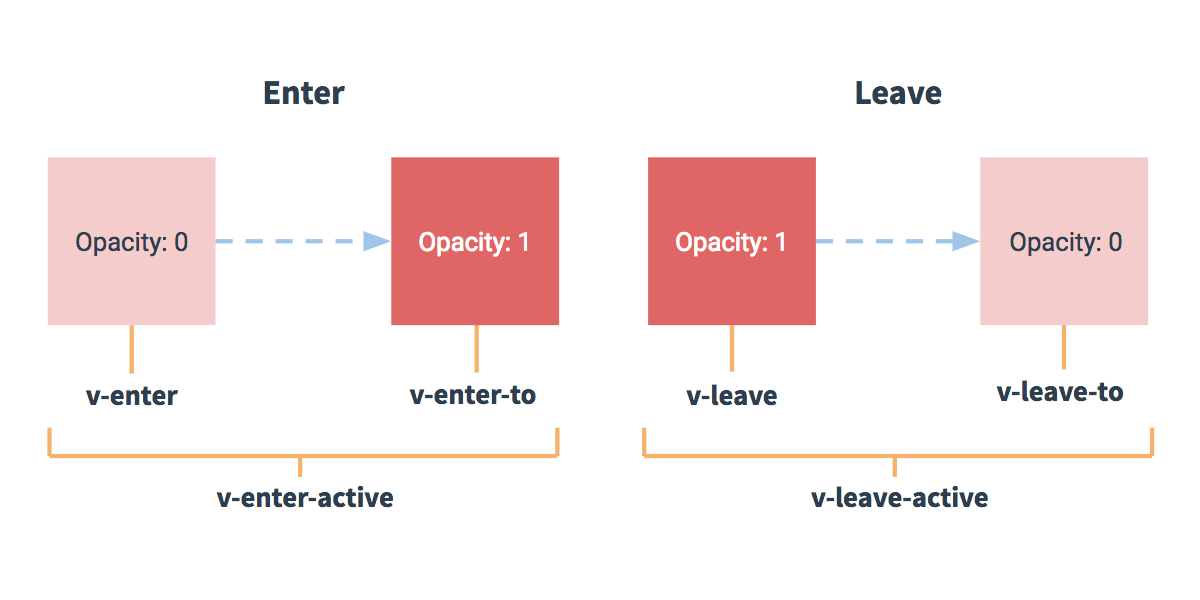
- 过渡中的类名前缀是可以更换的,通过
<transtion>组件的name特性可以指定过渡类的前缀12// 对应的过渡样式类就是.testAnim-enter、.testAnim-enter-active、.testAnim-enter-to<transtion name="testAnim">xxx</transition>
css过渡
最常用的
css动画
animation
- CSS 动画用法同 CSS 过渡,区别是在动画中
v-enter类名在节点插入 DOM 后不会立即删除,而是在 animationend 事件触发时(动画结束)删除。1234567891011121314151617181920212223242526272829<div id="example-2"><button @click="show = !show">Toggle show</button><transition name="bounce"><p v-if="show">Look at me!</p></transition></div>new Vue({el: '#example-2',data: {show: true}});.bounce-enter-active {animation: bounce-in .5s;}.bounce-leave-active {animation: bounce-in .5s reverse;}@keyframes bounce-in {0% {transform: scale(0);}50% {transform: scale(1.5);}100% {transform: scale(1);}}
自定义过渡类名
- 可以通过以下特性来自定义过渡类名;主要用来配合第三方css动画库使用;他们的优先级高于普通的类名
- enter-class
- enter-active-class
- enter-to-class (2.1.8+)
- leave-class
- leave-active-class
- leave-to-class (2.1.8+)123456789101112131415161718192021<link href="https://unpkg.com/animate.css@3.5.1/animate.min.css" rel="stylesheet" type="text/css"><div id="example-3"><button @click="show = !show">Toggle render</button><!-- 进入离开时用特殊的class --><transitionname="custom-classes-transition"enter-active-class="animated tada"leave-active-class="animated bounceOutRight"><p v-if="show">hello</p></transition></div>new Vue({el: '#example-3',data: {show: true}});
同时使用 Transitions 和 Animations
- Vue 为了知道过渡的完成,必须设置相应的事件监听器。它可以是 transitionend 或 animationend ,这取决于给元素应用的 CSS 规则。如果你使用其中任何一种,Vue 能自动识别类型并设置监听。
- 但是,在一些场景中,你需要给同一个元素同时设置两种过渡动效,比如 animation 很快的被触发并完成了,而 transition 效果还没结束。在这种情况中,你就需要使用 type 特性并设置 animation 或 transition 来明确声明你需要 Vue 监听的类型。
显性的过渡效果持续时间
- 在很多情况下,Vue 可以自动得出过渡效果的完成时机。默认情况下,Vue 会等待其在过渡效果的根元素的第一个 transitionend 或 animationend 事件。然而也可以不这样设定——比如,我们可以拥有一个精心编排的一序列过渡效果,其中一些嵌套的内部元素相比于过渡效果的根元素有延迟的或更长的过渡效果。在这种情况下你可以用
组件上的 duration 属性定制一个显性的过渡效果持续时间 (以毫秒计): 123<transition :duration="1000">...</transition>// 你也可以定制进入和移出的持续时间:<transition :duration="{ enter: 500, leave: 800 }">...</transition>
###JavaScript 钩子(Js动画)
可以在属性中声明 JavaScript 钩子,通过钩子在特定时间调用特定动画函数来实现js动画
beforeEnter->进入前enter->进入中after-enter->进入后enter-cancelled->取消后同理leave也有类似钩子
12345678910111213141516171819202122232425262728293031323334353637383940414243444546474849505152<transitionv-on:before-enter="beforeEnter"v-on:enter="enter"v-on:after-enter="afterEnter"v-on:enter-cancelled="enterCancelled"v-on:before-leave="beforeLeave"v-on:leave="leave"v-on:after-leave="afterLeave"v-on:leave-cancelled="leaveCancelled"><!-- ... --></transition>// ...methods: {// --------// 进入中// --------beforeEnter: function (el) {// ...},// 此回调函数是可选项的设置// 与 CSS 结合时使用enter: function (el, done) {// ...done()},afterEnter: function (el) {// ...},enterCancelled: function (el) {// ...},// --------// 离开时// --------beforeLeave: function (el) {// ...},// 此回调函数是可选项的设置// 与 CSS 结合时使用leave: function (el, done) {// ...done()},afterLeave: function (el) {// ...},// leaveCancelled 只用于 v-show 中leaveCancelled: function (el) {// ...}}这些钩子函数可以结合 CSS transitions/animations 使用,也可以单独使用。
- 当只用 JavaScript 过渡的时候, 在 enter 和 leave 中,回调函数 done 是必须的 。 否则,它们会被同步调用,过渡会立即完成。
- 推荐对于仅使用 JavaScript 过渡的元素添加 v-bind:css=”false”,Vue 会跳过 CSS 的检测。这也可以避免过渡过程中 CSS 的影响。
初始渲染的过渡
定义第一次渲染时,如何过渡
通过添加
appear特性,可以开启初始渲染过渡动画和
enter、leave过渡一样可以自己定义css类名12345678<transitionappearappear-class="custom-appear-class"appear-to-class="custom-appear-to-class"appear-active-class="custom-appear-active-class"><!-- ... --></transition>也有相应的js钩子
123456789<transitionappearv-on:before-appear="customBeforeAppearHook"v-on:appear="customAppearHook"v-on:after-appear="customAfterAppearHook"v-on:appear-cancelled="customAppearCancelledHook"><!-- ... --></transition>
多个元素的过渡
对于原生标签可以使用 v-if/v-else 。最常见的多标签过渡是一个列表和描述这个列表为空消息的元素
123456<transition><table v-if="items.length > 0"><!-- ... --></table><p v-else>Sorry, no items found.</p></transition>当有相同标签名的元素切换时,需要通过 key 特性设置唯一的值来标记以让 Vue 区分它们,否则 Vue 为了效率只会替换相同标签内部的内容。即使在技术上没有必要,给在
组件中的多个元素设置 key 是一个更好的实践。 12345678910111213141516171819202122232425262728293031323334353637383940<style type="text/css">.fade-enter,.fade-leave {opacity: 0;}.fade-enter-active,.fade-leave-active {transition: all .3s ease-in-out;}</style><div id="app"><transition name="fade"><!-- 没有加key,根据vue的就地复用原则,他们将只替换内容,因此不会产生过渡动画 --><!-- <button v-if="isEditing">Save</button><button v-else>Edit</button> --><!-- 添加key --><!-- <button v-if="isEditing" key="save">Save</button><button v-else key="edit">Edit</button> --><!-- 在一些场景中,也可以给通过给同一个元素的 key 特性设置不同的状态来代替 v-if 和 v-else,上面的例子可以重写为: --><button v-bind:key="isEditing">{{ isEditing ? 'Save' : 'Edit' }}</button></transition><button @click="isEditing=!isEditing">点击</button></div>var vm = new Vue({el: '#app',data: {isEditing: true}});使用多个 v-if 的多个元素的过渡可以重写为绑定了动态属性的单个元素过渡
123456789101112131415161718192021222324252627<transition><button v-if="docState === 'saved'" key="saved">Edit</button><button v-if="docState === 'edited'" key="edited">Save</button><button v-if="docState === 'editing'" key="editing">Cancel</button></transition><!-- 重写 --><transition><button v-bind:key="docState">{{ buttonMessage }}</button></transition>// ...computed: {buttonMessage: function () {switch (this.docState) {case 'saved': return 'Edit'case 'edited': return 'Save'case 'editing': return 'Cancel'}}}
多元素的过渡模式
多元素过渡时(一个enter、一个leave)默认是进入和离开同时发生;这样可能会发生过渡时画面抖动的问题;通过多元素的过渡模式可以解决
- 通过在
<transtion>上添加mode特性便可指定过渡模式- in-out: 新元素先进行过渡进入,完成之后当前元素过渡离开。->先enter后leave
- out-in: 当前元素先进行过渡离开,完成之后新元素过渡进入。->先leave后enter1234567891011121314151617181920212223242526272829303132<style type="text/css">.fade-enter,.fade-leave-to {opacity: 0;}.fade-enter {transform: translateX(10px);}.fade-leave-to {transform: translateX(-10px);}.fade-enter-active,.fade-leave-active {transition: all .3s ease-in-out;}</style><div id="app"><transition name="fade" mode="in-out"><button :key="isEditing" @click="isEditing=!isEditing" :style="{position:'absolute'}">{{ isEditing }}</button></transition></div>var vm = new Vue({el: '#app',data: {isEditing: true}});
多个组件的过渡
- 多个组件的过渡简单很多 - 我们不需要使用 key 特性。相反,我们只需要使用动态组件1234567891011121314151617181920212223<transition name="component-fade" mode="out-in"><component v-bind:is="view"></component></transition>new Vue({el: '#transition-components-demo',data: {view: 'v-a'},components: {'v-a': {template: '<div>Component A</div>'},'v-b': {template: '<div>Component B</div>'}}});.component-fade-enter-active, .component-fade-leave-active {transition: opacity .3s ease;}.component-fade-enter, .component-fade-leave-to{opacity: 0;}
列表过渡
- 那么怎么同时渲染整个列表,比如使用 v-for ?在这种场景中,使用
<transition-group>组件。- 不同于
<transition>,它会以一个真实元素呈现:默认为一个 。你也可以通过tag特性更换为其他元素。 - 内部元素 总是需要 提供唯一的 key 属性值1234567891011121314151617181920212223242526272829303132333435363738394041424344<style type="text/css">.list-item {display: inline-block;margin-right: 10px;}.list-enter-active,.list-leave-active {transition: all 1s;}.list-enter,.list-leave-to {opacity: 0;transform: translateY(30px);}</style><div id="list-demo" class="demo"><button v-on:click="add">Add</button><button v-on:click="remove">Remove</button><!-- 因为指定了tag特性,所以transition-group将被p取代 --><transition-group name="list" tag="p"><!-- 绑定唯一的key --><span v-for="item in items" v-bind:key="item" class="list-item">{{ item }}</span></transition-group></div>new Vue({el: '#list-demo',data: {items: [1, 2, 3, 4, 5, 6, 7, 8, 9],nextNum: 10},methods: {randomIndex: function() {return Math.floor(Math.random() * this.items.length)},add: function() {this.items.splice(this.randomIndex(), 0, this.nextNum++)},remove: function() {this.items.splice(this.randomIndex(), 1)},}});
- 不同于
列表的位移过渡
- 上面的例子,当添加和移除元素的时候,周围的元素会瞬间移动到他们的新布局的位置,而不是平滑的过渡
<transition-group>组件还有一个特殊之处。不仅可以进入和离开动画,还可以改变定位。要使用这个新功能只需了解新增的v-move特性,它会在元素的改变定位的过程中应用。像之前的类名一样,可以通过name属性来自定义前缀,也可以通过move-class属性手动设置12345678910111213141516171819202122232425<style type="text/css">/*设置-move*/.flip-list-move {transition: transform 1s;}</style><div id="flip-list-demo" class="demo"><button v-on:click="shuffle">洗牌</button><transition-group name="flip-list" tag="ul"><li v-for="item in items" v-bind:key="item">{{ item }}</li></transition-group></div>new Vue({el: '#flip-list-demo',data: {items: [1, 2, 3, 4, 5, 6, 7, 8, 9]},methods: {shuffle: function() {this.items = _.shuffle(this.items) // 打乱}}})内部的实现,Vue 使用了一个叫 FLIP 简单的动画队列使用 transforms 将元素从之前的位置平滑过渡新的位置。
- 需要注意的是使用FLIP过渡的元素不能设置为 display: inline 。作为替代方案,可以设置为 display: inline-block 或者放置于 flex 中
列表的渐进过渡
- 通过 data 属性与 JavaScript 通信 ,就可以实现列表的渐进过渡1234567891011121314151617181920212223242526272829303132333435363738394041424344454647484950515253<script src="https://cdnjs.cloudflare.com/ajax/libs/velocity/1.2.3/velocity.min.js"></script><div id="staggered-list-demo"><input v-model="query"><!-- 因为是全部用js完成动画,所以v-bind:css="false",避开css动画检查,提高效率;并在各个动画钩子处绑定动画函数 --><transition-group name="staggered-fade" tag="ul" v-bind:css="false" v-on:before-enter="beforeEnter" v-on:enter="enter" v-on:leave="leave"><!-- 绑定唯一的key并绑定索引 --><li v-for="(item, index) in computedList" v-bind:key="item.msg" v-bind:data-index="index">{{ item.msg }}</li></transition-group></div>new Vue({el: '#staggered-list-demo',data: {query: '',list: [{ msg: 'Bruce Lee' },{ msg: 'Jackie Chan' },{ msg: 'Chuck Norris' },{ msg: 'Jet Li' },{ msg: 'Kung Fury' }]},computed: {computedList: function() {var vm = thisreturn this.list.filter(function(item) {return item.msg.toLowerCase().indexOf(vm.query.toLowerCase()) !== -1})}},methods: {beforeEnter: function(el) {el.style.opacity = 0el.style.height = 0},enter: function(el, done) {// 根据索引创建延迟var delay = el.dataset.index * 150;setTimeout(function() {Velocity(el, { opacity: 1, height: '1.6em' }, { complete: done })}, delay)},leave: function(el, done) {var delay = el.dataset.index * 150setTimeout(function() {Velocity(el, { opacity: 0, height: 0 }, { complete: done })}, delay)}}})
可复用的过渡
- 过渡可以通过 Vue 的组件系统实现复用
- 要创建一个可复用过渡组件,你需要做的就是将
或者 作为根组件,然后将任何子组件放置在其中就可以了。 1234567891011121314151617181920Vue.component('my-special-transition', {template: '\<transition\name="very-special-transition"\mode="out-in"\v-on:before-enter="beforeEnter"\v-on:after-enter="afterEnter"\>\<slot></slot>\</transition>\',methods: {beforeEnter: function (el) {// ...},afterEnter: function (el) {// ...}}})
- 要创建一个可复用过渡组件,你需要做的就是将
动态过渡
- Vue 中即使是过渡也是数据驱动的,过渡中的各种状态能通过数据动态改变。
- 当你想用 Vue 的过渡系统来定义的 CSS 过渡/动画 在不同过渡间切换会非常有用
- 所有的过渡特性都是动态绑定。
- 它不仅是简单的特性,通过事件的钩子函数方法,可以在获取到相应上下文数据。
- 这意味着,可以根据组件的状态通过 JavaScript 过渡设置不同的过渡效果。1234567891011121314151617181920212223242526272829303132333435363738394041424344454647484950515253545556575859606162636465<script src="https://cdnjs.cloudflare.com/ajax/libs/velocity/1.2.3/velocity.min.js"></script><div id="dynamic-fade-demo" class="demo">Fade In: <input type="range" v-model="fadeInDuration" min="0" v-bind:max="maxFadeDuration">Fade Out: <input type="range" v-model="fadeOutDuration" min="0" v-bind:max="maxFadeDuration"><transitionv-bind:css="false"v-on:before-enter="beforeEnter"v-on:enter="enter"v-on:leave="leave"><p v-if="show">hello</p></transition><buttonv-if="stop"v-on:click="stop = false; show = false">Start animating</button><buttonv-elsev-on:click="stop = true">Stop it!</button></div>new Vue({el: '#dynamic-fade-demo',data: {show: true,fadeInDuration: 1000,fadeOutDuration: 1000,maxFadeDuration: 1500,stop: true},mounted: function () {this.show = false},methods: {beforeEnter: function (el) {el.style.opacity = 0},enter: function (el, done) {var vm = thisVelocity(el,{ opacity: 1 },{duration: this.fadeInDuration,// 持续时间为动态绑定complete: function () {done()if (!vm.stop) vm.show = false}})},leave: function (el, done) {var vm = thisVelocity(el,{ opacity: 0 },{duration: this.fadeOutDuration,// 持续时间为动态绑定complete: function () {done()vm.show = true}})}}})
过渡状态
- Vue 的过渡系统提供了非常多简单的方法设置进入、离开和列表的动效。有些变化中间的过渡状态无法通过vue独自完成,例如
- 数字和运算(数字从1变为10中间的过渡)
- 颜色的显示(从一种颜色变化到另一种的过渡)
- SVG 节点的位置
- 元素的大小和其他的属性
- 所有的原始数字都被事先存储起来,可以直接转换到数字。做到这一步,我们就可以结合 Vue 的响应式和组件系统,使用第三方库来实现切换元素的过渡状态,补间动画
状态动画 与 watcher
- 通过 watcher 我们能监听到任何数值属性的数值更新,然后调用一些辅助用的动画库(例如tween.js、color.js)完成相应的特殊过渡123456789101112131415161718192021222324252627282930<script src="https://unpkg.com/tween.js@16.3.4"></script><div id="animated-number-demo"><input v-model.number="number" type="number" step="20"><p>{{ animatedNumber }}</p></div>new Vue({el: '#animated-number-demo',data: {number: 0,animatedNumber: 0},watch: {number: function(newValue, oldValue) {var vm = thisfunction animate () {if (TWEEN.update()) {requestAnimationFrame(animate)}}new TWEEN.Tween({ tweeningNumber: oldValue }).easing(TWEEN.Easing.Quadratic.Out).to({ tweeningNumber: newValue }, 500).onUpdate(function () {vm.animatedNumber = this.tweeningNumber.toFixed(0)}).start()animate()}}})
动态状态转换
- 类似动态过渡,每个状态都是可变的(响应式的)
通过组件组织过渡
- 管理太多的状态转换会很快的增加 Vue 实例或者组件的复杂性,幸好很多的动画可以提取到专用的子组件。1234567891011121314151617181920212223242526272829303132333435363738394041424344454647484950515253545556575859606162636465666768697071<script src="https://unpkg.com/tween.js@16.3.4"></script><div id="example-8"><input v-model.number="firstNumber" type="number" step="20"> +<input v-model.number="secondNumber" type="number" step="20"> = {{ result }}<p><!-- 传入输入框的值 --><animated-integer v-bind:value="firstNumber"></animated-integer> +<animated-integer v-bind:value="secondNumber"></animated-integer> =<animated-integer v-bind:value="result"></animated-integer></p></div>// 这种复杂的补间动画逻辑可以被复用// 任何整数都可以执行动画// 组件化使我们的界面十分清晰// 可以支持更多更复杂的动态过渡Vue.component('animated-integer', {template: '<span>{{ tweeningValue }}</span>',props: {value: { // 接收的值type: Number,required: true}},data: function() {return {tweeningValue: 0}},watch: { // 传过来的值有变化,触发tweenvalue: function(newValue, oldValue) {this.tween(oldValue, newValue)}},mounted: function() { // 刚载入,触发默认tweenthis.tween(0, this.value)},methods: {tween: function(startValue, endValue) {var vm = this;// raffunction animate() {if (TWEEN.update()) {requestAnimationFrame(animate)}}// 数值变化的补间动画new TWEEN.Tween({ tweeningValue: startValue }).to({ tweeningValue: endValue }, 500).onUpdate(function() {vm.tweeningValue = this.tweeningValue.toFixed(0)}).start();// 调用一次animate();}}});new Vue({el: '#example-8',data: {firstNumber: 20,secondNumber: 40},computed: {result: function() {return this.firstNumber + this.secondNumber}}})
Render函数->用到再补
自定义指令
- vue2中代码复用的主要形式和抽象是组件,有的情况下,你仍然需要对纯 DOM 元素进行底层操作,这时候就会用到自定义指令。
简介
注册
全局注册
12345678// 注册一个全局自定义指令 v-focusVue.directive('focus', {// 当绑定元素插入到 DOM 中。inserted: function (el) {// 聚焦元素el.focus()}})局部注册
12345directives: {focus: {// 指令的定义---}}使用->
<input v-focus>
钩子函数
- 自定义指令提供下面钩子
bind->只调用一次,只在第一次绑定到元素时调用,主要用做初始化工作inserted->被绑定元素插入父节点时调用(父节点存在即可调用,不必存在于 document 中)componentUpdated->所在组件的 VNode 及其孩子的 VNode 全部更新时调用。update->所在组件的 VNode 更新时调用,但是可能发生在其孩子的 VNode 更新之前。指令的值可能发生了改变也可能没有。但是你可以通过比较更新前后的值来忽略不必要的模板更新unbind-> 只调用一次, 指令与元素解绑时调用
钩子函数参数
- 钩子函数的回调在被调用时,会自动传入一些参数
el,bingding,vnode,oldVnode
-el: 指令所绑定的元素,可以用来直接操作 DOM 。binding: 一个对象,包含以下属性name: 指令名,不包括 v- 前缀。value: 指令的绑定值, 例如: v-my-directive=”1 + 1”, value 的值是 2。oldValue: 指令绑定的前一个值,仅在 update 和 componentUpdated 钩子中可用。无论值是否改变都可用。expression: 绑定值的字符串形式。 例如 v-my-directive=”1 + 1” , expression 的值是 “1 + 1”。arg: 传给指令的参数。例如 v-my-directive:foo, arg 的值是 “foo”。modifiers: 一个包含修饰符的对象。 例如: v-my-directive.foo.bar, 修饰符对象 modifiers 的值是 { foo: true, bar: true }。
vnode: Vue 编译生成的虚拟节点oldVnode: 上一个虚拟节点,仅在 update 和 componentUpdated 钩子中可用。
- 除了 el 之外,其它参数都应该是只读的,尽量不要修改他们。如果需要在钩子之间共享数据,建议通过元素的 dataset 来进行。12345678910111213141516171819<div id="hook-arguments-example" v-demo:foo.a.b="message"></div>Vue.directive('demo', {bind: function (el, binding, vnode) {var s = JSON.stringifyel.innerHTML ='name: ' + s(binding.name) + '<br>' +'value: ' + s(binding.value) + '<br>' +'expression: ' + s(binding.expression) + '<br>' +'argument: ' + s(binding.arg) + '<br>' +'modifiers: ' + s(binding.modifiers) + '<br>' +'vnode keys: ' + Object.keys(vnode).join(', ')}});new Vue({el: '#hook-arguments-example',data: {message: 'hello!'}});
函数简写
- 大多数情况下,我们可能想在 bind 和 update 钩子上做重复动作,并且不想关心其它的钩子函数。
- 第二个参数不传入选项对象,而是一个函数,则表示此函数只会在bind和update时被调用123Vue.directive('color-swatch', function (el, binding) {el.style.backgroundColor = binding.value})
对象字面量
- 如果指令需要多个值,可以传入一个 JavaScript 对象字面量12345<div v-demo="{ color: 'white', text: 'hello!' }"></div>Vue.directive('demo', function (el, binding) {console.log(binding.value.color) // => "white"console.log(binding.value.text) // => "hello!"})
混合
- 当多个组件拥有相同的选项时,可以将这些公用选项抽象成一个mixin对象,然后通过配置组件的
mixins字段来混入选项(类似jQuery.extend方法) 混入策略
数据对象在内部进行合并;数据冲突时,以组件数据优先
12345678910111213141516171819202122var mixin = {data: function () {return {message: 'hello',foo: 'abc'}}}new Vue({mixins: [mixin],data: function () {return {message: 'goodbye',bar: 'def'}},created: function () {console.log(this.$data)// => { message: "goodbye", foo: "abc", bar: "def" }}})同名钩子函数,将会混合成一个数组,混入的钩子函数将在组件自身钩子函数之前调用
123456789101112131415var mixin = {created: function () {console.log('混入对象的钩子被调用')}}new Vue({mixins: [mixin],created: function () {console.log('组件钩子被调用')}})// => "混入对象的钩子被调用"// => "组件钩子被调用"值为对象的选项,例如 methods, components 和 directives,将被混合为同一个对象。两个对象键名冲突时,取组件对象的键值对
1234567891011121314151617181920212223242526var mixin = {methods: {foo: function () {console.log('foo')},conflicting: function () {console.log('from mixin')}}}var vm = new Vue({mixins: [mixin],methods: {bar: function () {console.log('bar')},conflicting: function () {console.log('from self')}}})vm.foo() // => "foo"vm.bar() // => "bar"vm.conflicting() // => "from self"
插件
|
|
单文件组件
|
|
生产环境部署提示
- 记得定义
process.env.NODE_ENV = 'production' vue-cli的build命令已经预先定义了
路由
简单路由
- HTML5 History API12345678910111213141516171819const NotFound = { template: '<p>Page not found</p>' }const Home = { template: '<p>home page</p>' }const About = { template: '<p>about page</p>' }const routes = {'/': Home,'/about': About}new Vue({el: '#app',data: {currentRoute: window.location.pathname},computed: {ViewComponent () {return routes[this.currentRoute] || NotFound}},render (h) { return h(this.ViewComponent) }})
官方路由Vue-router
基础使用
1234567891011121314151617181920212223242526272829303132333435363738394041// router/index.jsimport Vue from 'vue';import Router from 'vue-router';// 导入vue-router..import Recommend from 'components/recommend/recommend'import Singer from 'components/singer/singer'...Vue.use(Router); // 必须使用use方法来注册第三方插件export default new Router({// 导出一个vue-router实例routes: [{path: '/',redirect: '/recommend',// 没有匹配到的路径全部重定向到/recomend}, {path: '/recommend',// path一定是个路径,开头必须有/name: 'Recommend',component: Recommend,children: [{// 子路由path: ':id',// 传递的参数name: 'Disc',component: Disc}]})// src/main.jsimport Vue from 'vue'...import router from './router'; // 导入...new Vue({el: '#app',router,// 注册store,render: h => h(App)})动态路由匹配
12345678910const User = {template: '<div>User {{ $route.params.id }}</div>',// 获取传递动态路由参数}const router = new VueRouter({routes: [// 动态路径参数 以冒号开头{ path: '/user/:id', component: User }]})- 响应路由参数的变化
- 使用动态路由时,如果组件相同,仅路由参数不同,vue会复用组件(导致组件的生命周期钩子,无法再被触发),可以对路由参数的变化做个观测,来响应变化;1234567891011121314151617// 使用watch观测$route的变化,来做响应const User = {template: '...',watch: {'$route' (to, from) {// 对路由变化作出响应...}}}// 或者使用2.2+的beforeRouteUpdateconst User = {template: '...',beforeRouteUpdate (to, from, next) {// react to route changes...// don't forget to call next()}}
- 使用动态路由时,如果组件相同,仅路由参数不同,vue会复用组件(导致组件的生命周期钩子,无法再被触发),可以对路由参数的变化做个观测,来响应变化;
- 响应路由参数的变化
嵌套路由
- 在定义routes使用children字段来定义自路由,并在上层路由对应的组件中添加一个
router-view - 注意子路由开头不能以
/开头,这代表根目录123456789101112131415161718192021222324252627282930// User.jsconst User = {template: `<div class="user"><h2>User {{ $route.params.id }}</h2><router-view></router-view></div>`}const router = new VueRouter({routes: [{ path: '/user/:id', component: User,children: [{// 当 /user/:id/profile 匹配成功,// UserProfile 会被渲染在 User 的 <router-view> 中path: 'profile',component: UserProfile},{// 当 /user/:id/posts 匹配成功// UserPosts 会被渲染在 User 的 <router-view> 中path: 'posts',component: UserPosts}]}]})
- 在定义routes使用children字段来定义自路由,并在上层路由对应的组件中添加一个
路由跳转api
router.push(),向历史记录栈中压入一条历史记录
123456789101112131415// 字符串router.push('home')// 对象router.push({ path: 'home' })// 命名的路由router.push({ name: 'user', params: { userId: 123 }})// 带查询参数,变成 /register?plan=privaterouter.push({ path: 'register', query: { plan: 'private' }})// 如果提供了 path,params就会被忽略,上述例子中的 query 并不属于这种情况// 这里的 params 不生效router.push({ path: '/user', params: { userId }}) // -> /userrouter.replace()替换当前记录,用法类似push
- router.go()历史记录前进后台几步
可以给路由命名
12345678910111213const router = new VueRouter({routes: [{path: '/user/:userId',name: 'user',// 取个名字component: User}]})// 调用<router-link :to="{ name: 'user', params: { userId: 123 }}">User</router-link>router.push({ name: 'user', params: { userId: 123 }})也可以给视图命名,方便创建sidebar、main双视图的布局
1234567891011121314151617<router-view class="view one"></router-view> // 默认视图的name为default<router-view class="view two" name="a"></router-view><router-view class="view three" name="b"></router-view>const router = new VueRouter({routes: [{path: '/',components: {// 匹配'/'路径时,default视图渲染Foo组件,a视图渲染Bar,b视图渲染Bazdefault: Foo,a: Bar,b: Baz}}]})重定向、别名
1234567891011121314// 重定向// 当用户访问 /a时,URL 将会被替换成 /b,然后匹配路由为 /bconst router = new VueRouter({routes: [{ path: '/a', redirect: '/b' }]})// 别名// /a 的别名是 /b,意味着,当用户访问 /b 时,URL 会保持为 /b,但是路由匹配则为 /a,就像用户访问 /a 一样。const router = new VueRouter({routes: [{ path: '/a', component: A, alias: '/b' }]})向组件传递数据
12345678910111213141516171819202122232425262728293031// 利用动态路径参数来直接传递,组件和路由耦合性高const User = {template: '<div>User {{ $route.params.id }}</div>'}const router = new VueRouter({routes: [{ path: '/user/:id', component: User }]})// 通过 props 解耦const User = {props: ['id'],template: '<div>User {{ id }}</div>'}const router = new VueRouter({routes: [{path: '/user/:id',component: User,props: true,// 参数会做为props传入到组件中},// 对于包含命名视图的路由,你必须分别为每个命名视图添加 `props` 选项:{path: '/user/:id',components: { default: User, sidebar: Sidebar },props: { default: true, sidebar: false }}]})注册导航守卫(事件)
123456789101112131415161718192021222324252627282930313233343536373839404142434445464748495051const router = new VueRouter({ ... })// 全局路由守卫// 全局前置守卫,路由确认时触发router.beforeEach((to, from, next) => {// to: Route: 即将要进入的目标 路由对象// from: Route: 当前导航正要离开的路由// next: Function: 一定要调用该方法来 resolve 这个钩子。执行效果依赖 next 方法的调用参数。})// 全局解析守卫,路由确认之后,组内守卫、异步路由组建被解析之后触发router.beforeResolve()// 全局后置守卫,路由到达后触发router.afterEach((to, from) => {// ...})// 单独路由的守卫// 定义在一个单独路由上const router = new VueRouter({routes: [{path: '/foo',component: Foo,beforeEnter: (to, from, next) => {// ...}}]})// 组件内路由守卫const Foo = {template: `...`,beforeRouteEnter (to, from, next) {// 在渲染该组件的对应路由被 confirm 前调用// 因为当守卫执行前,组件实例还没被创建// 不!能!获取组件实例 `this`,不过这个守卫中的next很特殊,可以接收一个回调,回调会接收到vm实例,可以通过vm实例来访问thisnext(vm=>{// do sth});},beforeRouteUpdate (to, from, next) {// 在当前路由改变,但是该组件被复用时调用// 举例来说,对于一个带有动态参数的路径 /foo/:id,在 /foo/1 和 /foo/2 之间跳转的时候,// 由于会渲染同样的 Foo 组件,因此组件实例会被复用。而这个钩子就会在这个情况下被调用。// 可以访问组件实例 `this`},beforeRouteLeave (to, from, next) {// 导航离开该组件的对应路由时调用// 可以访问组件实例 `this`}}路由解析流程
1234567891011121.导航被触发。2.在失活的组件里调用离开守卫。3.调用全局的 beforeEach 守卫。4.在重用的组件里调用 beforeRouteUpdate 守卫 (2.2+)。5.在路由配置里调用 beforeEnter。6.解析异步路由组件。7.在被激活的组件里调用 beforeRouteEnter。8.调用全局的 beforeResolve 守卫 (2.5+)。9.导航被确认。10.调用全局的 afterEach 钩子。11.触发 DOM 更新。12.用创建好的实例调用 beforeRouteEnter 守卫中传给 next 的回调函数。路由元信息,可用来完成页面是否登录的需求
1234567891011121314151617181920212223242526272829303132333435363738const router = new VueRouter({routes: [{path: '/foo',component: Foo,children: [{path: 'bar',component: Bar,// a meta field,定义/foo/bar需要登录meta: { requiresAuth: true }}]}]});// 注册全局的路由前置守卫router.beforeEach((to, from, next) => {// 一个路由匹配到的所有路由记录会暴露为 $route 对象的 $route.matched 数组// 遍历$route.matched数组,检查meta字段if (to.matched.some(record => record.meta.requiresAuth)) {// this route requires auth, check if logged in// if not, redirect to login page.// 未登录,则跳转登录,并附带一个返回的urlif (!auth.loggedIn()) {next({path: '/login',// 传递给登录页面一个返回的url地址query: { redirect: to.fullPath }})} else {next()}} else {next() // 确保一定要调用 next()}})路由过渡效果
12345678910111213141516171819202122232425262728293031323334353637383940414243// 所有路由设置一样的过渡效果<transition><router-view></router-view></transition>// 配合keep-alive<transition><keep-alive><router-view></router-view></keep-alive></transition>// 单个路由设置过度效果const Foo = {template: `<transition name="slide"><div class="foo">...</div></transition>`}const Bar = {template: `<transition name="fade"><div class="bar">...</div></transition>`}// 动态过渡(进入用一个效果,退出用另一个效果)<!-- 使用动态的 transition name --><transition :name="transitionName"><router-view></router-view></transition>// 接着在父组件内// watch $route 决定使用哪种过渡watch: {'$route' (to, from) {const toDepth = to.path.split('/').lengthconst fromDepth = from.path.split('/').lengththis.transitionName = toDepth < fromDepth ? 'slide-right' : 'slide-left'}}数据获取
12345678910111213141516171819202122232425262728293031323334353637383940414243444546474849// 导航完成后,在created中获取数据export default {data () {return {loading: false,post: null,error: null}},created () {// 组件创建完后获取数据,// 此时 data 已经被 observed 了this.fetchData()}}// 导航进入前获取数据export default {data () {return {post: null,error: null}},beforeRouteEnter (to, from, next) {getPost(to.params.id, (err, post) => {next(vm => vm.setData(err, post))})},// 路由改变前,组件就已经渲染完了// 逻辑稍稍不同beforeRouteUpdate (to, from, next) {this.post = nullgetPost(to.params.id, (err, post) => {this.setData(err, post)next()})},methods: {setData (err, post) {if (err) {this.error = err.toString()} else {this.post = post}}}}记录上次滚动位置
12345678910111213141516171819202122232425262728const router = new VueRouter({routes: [...],scrollBehavior (to, from, savedPosition) {// return 期望滚动到哪个的位置}})const router = new VueRouter({routes: [...],scrollBehavior (to, from, savedPosition) {// 如果savedPosition,存在则滚动到特定位置,否则滚动到顶部if (savedPosition) {return savedPosition} else {return { x: 0, y: 0 }}}})// 如果你要模拟『滚动到锚点』的行为scrollBehavior (to, from, savedPosition) {if (to.hash) {return {selector: to.hash}}}路由懒加载
- 路由被访问时,才加载对应的组件123456789101112131415161718192021222324252627282930313233343536373839404142434445464748495051525354555657585960616263646566676869707172737475767778798081828384858687888990919293949596979899100101import Vue from 'vue'import Router from 'vue-router'Vue.use(Router)const Recommend = (resolve) => {import('components/recommend/recommend').then((module) => {resolve(module)})}const Singer = (resolve) => {import('components/singer/singer').then((module) => {resolve(module)})}const Rank = (resolve) => {import('components/rank/rank').then((module) => {resolve(module)})}const Search = (resolve) => {import('components/search/search').then((module) => {resolve(module)})}const SingerDetail = (resolve) => {import('components/singer-detail/singer-detail').then((module) => {resolve(module)})}const Disc = (resolve) => {import('components/disc/disc').then((module) => {resolve(module)})}const TopList = (resolve) => {import('components/top-list/top-list').then((module) => {resolve(module)})}const UserCenter = (resolve) => {import('components/user-center/user-center').then((module) => {resolve(module)})}export default new Router({routes: [{path: '/',redirect: '/recommend'}, {path: '/recommend',name: 'Recommend',component: Recommend,children: [{path: ':id',name: 'Disc',component: Disc}]},{path: '/singer',name: 'Singer',component: Singer,children: [{path: ':id',name: 'SingerDetail',component: SingerDetail}]}, {path: '/rank',name: 'Rank',component: Rank,children:[{path:':id',name: 'TopList',component:TopList}]}, {path: '/search',name: 'Search',component: Search,children: [{path: ':id',name: 'SingerDetail',component: SingerDetail}]},{path:'/user',name:'User',component:UserCenter}]})
- 路由被访问时,才加载对应的组件
router-link- 默认被渲染为a标签
- 激活时,会自动加上
router-link-active样式类12345678910111213141516171819<!-- 字符串 --><router-link to="home">Home</router-link><!-- 渲染结果 --><a href="home">Home</a><!-- 使用 v-bind 的 JS 表达式 --><router-link v-bind:to="'home'">Home</router-link><!-- 不写 v-bind 也可以,就像绑定别的属性一样 --><router-link :to="'home'">Home</router-link><!-- 同上 --><router-link :to="{ path: 'home' }">Home</router-link><!-- 命名的路由 --><router-link :to="{ name: 'user', params: { userId: 123 }}">User</router-link><!-- 带查询参数,下面的结果为 /register?plan=private --><router-link :to="{ path: 'register', query: { plan: 'private' }}">Register</router-link>
router-view- 可以通过name定义命名视图
- 配合keep-alive、transition12345<transition><keep-alive><router-view></router-view></keep-alive></transition>
状态管理
类 Flux 状态管理的官方实现
- 由于多个状态分散的跨越在许多组件和交互间各个角落,大型应用复杂度也经常逐渐增长。为了解决这个问题,Vue 提供 vuex: 我们有受到 Elm 启发的状态管理库
简单状态管理起步使用
Vue 应用中原始数据对象的实际来源 - 当访问数据对象时,一个 Vue 实例只是简单的代理访问。所以,如果你有一处需要被多个实例间共享的状态,可以简单地通过维护一份数据来实现共享
1234567const sourceOfTruth = {}const vmA = new Vue({data: sourceOfTruth})const vmB = new Vue({data: sourceOfTruth})现在当 sourceOfTruth 发生变化,vmA 和 vmB 都将自动的更新引用它们的视图。子组件们的每个实例也会通过 this.$root.$data 去访问。现在我们有了唯一的实际来源,但是,调试将会变为噩梦。任何时间,我们应用中的任何部分,在任何数据改变后,都不会留下变更过的记录
为了解决这个问题,我们采用一个简单的 store 模式:
1234567891011121314var store = {debug: true,state: {message: 'Hello!'},setMessageAction (newValue) {if (this.debug) console.log('setMessageAction triggered with', newValue)this.state.message = newValue},clearMessageAction () {if (this.debug) console.log('clearMessageAction triggered')this.state.message = ''}}所有 store 中 state 的改变,都放置在 store 自身的 action 中去管理,这种集中式状态管理能够被更容易地理解哪种类型的 mutation 将会发生,以及它们是如何被触发。当错误出现时,我们现在也会有一个 log 记录 bug 之前发生了什么
- 此外,每个实例/组件仍然可以拥有和管理自己的私有状态:123456789101112var vmA = new Vue({data: {privateState: {},sharedState: store.state}})var vmB = new Vue({data: {privateState: {},sharedState: store.state}})
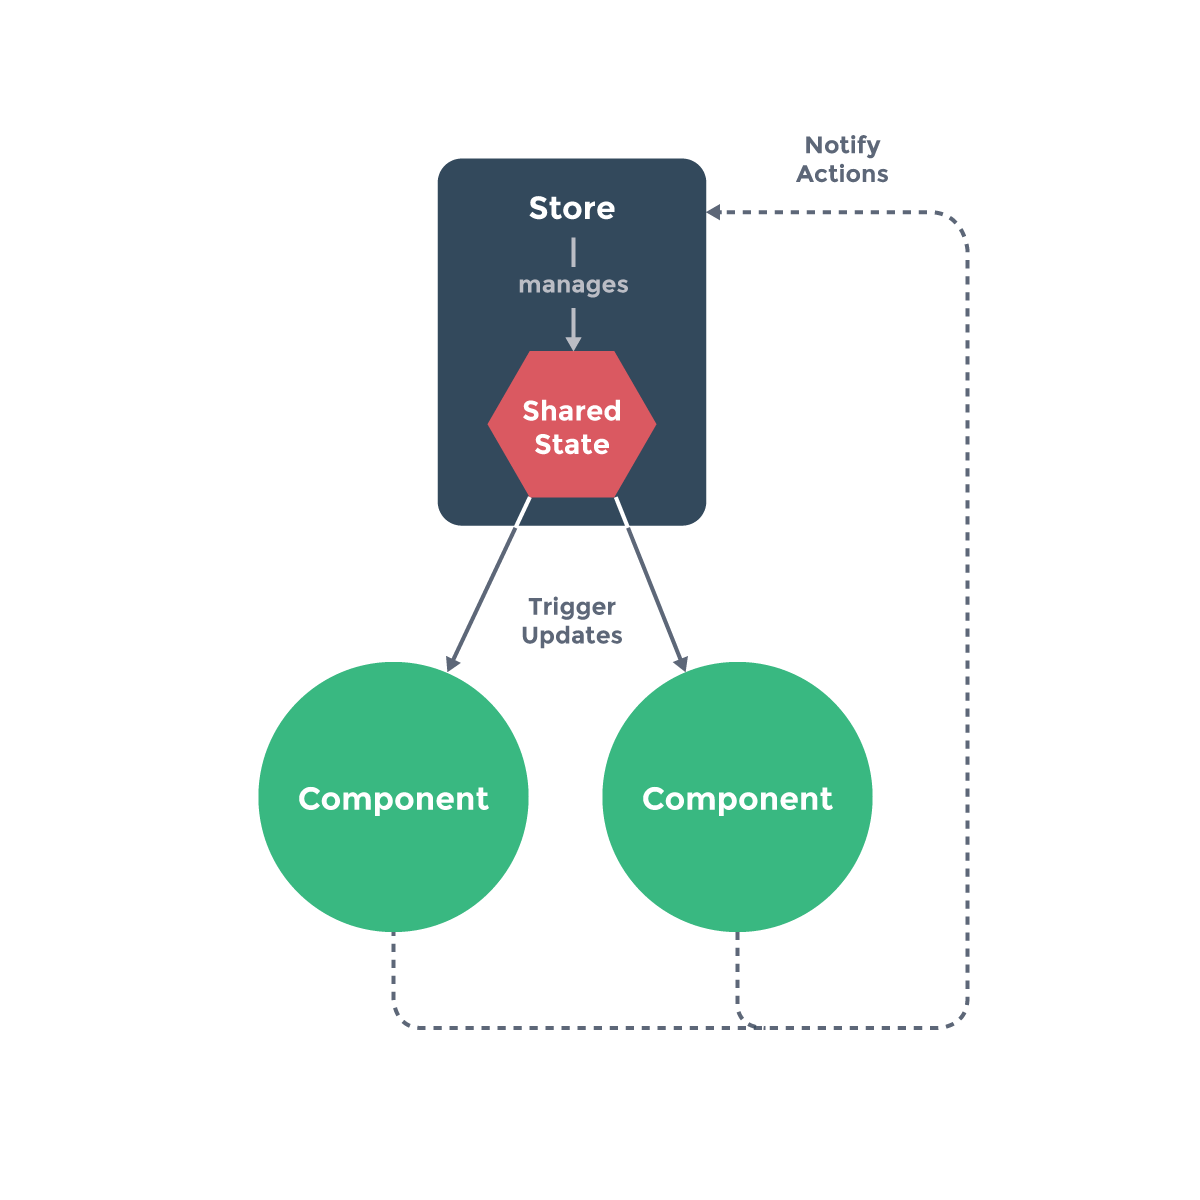
- 重要的是,注意你不应该在 action 中 替换原始的状态对象 - 组件和 store 需要引用同一个共享对象,mutation 才能够被观察
- 接着我们继续延伸约定,组件不允许直接修改属于 store 实例的 state,而应执行 action 来分发 (dispatch) 事件通知 store 去改变,我们最终达成了 Flux 架构
这样约定的好处是,我们能够记录所有 store 中发生的 state 改变,同时实现能做到记录变更 (mutation) 、保存状态快照、历史回滚/时光旅行的先进的调试工具
vuex
1234567891011121314151617181920const store = new Vuex.Store({state: {// 需要全局共享的数据count: 1},mutations: {// 注册一个increment mutationsincrement (state,payload) {// 变更状态state.count += payload.amount}},actions: {incrementAsync (context,payload) {setTimeout(() => {context.commit('increment')}, 1000)}}})states- 需要全局共享的基础数据,派生数据(计算数据)可以通过编写getters来实现
getters- 类似计算属性,可以用来访问基于state派生出的一些state,主要用来访问states
mutations- 很类似事件,只能通过提交mutations来改变state(方便开发工具跟踪),主要用来设置states
- 提交mutaions是改变state的唯一方式
- 只能是同步任务,异步任务需要
actions来完成 - 每一个mutation,store会传入state和可选的payload
commit- 用来提交
mutaions - 可以传递额外的参数
payload给mutaions123store.commit('increment', {amount: 10})
- 用来提交
actions- 主要用来完成异步任务;需要请求后台的任务全部放在
actions中 action不会直接变更状态,而是通过提交mutation来改变state,- 每个action,store会传入一个context和可选的payload,context包含store实例的所有方法和属性。因此你可以调用
context.commit提交一个mutation,或者通过context.state和context.getters来获取state和getters
- 主要用来完成异步任务;需要请求后台的任务全部放在
dispatch- 用来分发(提交)action
- 可以传递额外的参数(
payload)给actions123store.dispatch('incrementAsync', {amount: 10})
辅助函数
123456789101112131415161718192021222324252627282930313233343536// mapState、mapGetters、mapMutations、mapActions,都是返回一个对象,可以使用扩展预算符解析出来new Vue({el:'#app',store,computed: {localComputed () {},// 使用对象展开运算符将此对象混入到外部对象中...mapState([count,// 将this.count 映射为 store.state.count]),...mapGetters(['doneTodosCount',// 将this.doneTodosCount 映射为 store.getters.doneTodosCount'anotherGetter',// 将this.anotherGetter 映射为 store.getters.anotherGetter])},methods: {...mapMutations(['increment', // 将 `this.increment()` 映射为 `this.$store.commit('increment')`// `mapMutations` 也支持载荷:'incrementBy' // 将 `this.incrementBy(amount)` 映射为 `this.$store.commit('incrementBy', amount)`]),...mapMutations({add: 'increment' // 将 `this.add()` 映射为 `this.$store.commit('increment')`}),...mapActions(['increment', // 将 `this.increment()` 映射为 `this.$store.dispatch('increment')`// `mapActions` 也支持载荷:'incrementBy' // 将 `this.incrementBy(amount)` 映射为 `this.$store.dispatch('incrementBy', amount)`]),...mapActions({add: 'increment' // 将 `this.add()` 映射为 `this.$store.dispatch('increment')`})}});实际项目目录
123456789101112131415161718192021222324252627282930313233343536373839404142434445464748495051525354555657585960616263646566676869707172737475767778798081828384858687888990919293949596979899100101102103104105106107108109110111112113114115116117118119120121122123124125126127128129130131132133134135136137138139140141142143144145146147148149150151152153154155156157158159160161162163164165166167168169170171172173174175176177178179180181182183184185186187188189190191192193194195196197198199200201202203204205206207208209210211212213214215216217218219220221222223224225226227228229230231232233234235236237238239240241242243244245246247248249250251252253254255256257258259260261262263264265266267268269270271272273274275276277278279280281282283284285286287288289290291292293294295296297298299300301302303304305306307308309310311|---store/actions.js // 保存所有异步任务getters.js // 保存所有gettersindex.js // 导入state、getter...来实例化vuexmutations-type.js // 保存所有mutations类型mutations.js // 实际的mutation函数state.js // 所有需要共享的数据// state.js// 首先确定哪些数据需要vuex来管理,并给定默认值import {playMode} from 'common/js/config'import {loadSearch,loadPlay,loadFavorite} from 'common/js/cache'const state = {singer: {},playing: false,fullScreen: false,playlist: [],sequenceList: [],mode: playMode.sequence,currentIndex: -1,disc:{},topList:{},searchHistory:loadSearch(),playHistory:loadPlay(),favoriteList:loadFavorite(),};export default state;// 导出state对象// mutation-types.js// 确定针对state的修改export const SET_SINGER = 'SET_SINGER'export const SET_PLAYING_STATE = 'SET_PLAYING_STATE'export const SET_FULL_SCREEN = 'SET_FULL_SCREEN'export const SET_PLAYLIST = 'SET_PLAYLIST'export const SET_SEQUENCE_LIST = 'SET_SEQUENCE_LIST'export const SET_PLAY_MODE = 'SET_PLAY_MODE'export const SET_CURRENT_INDEX = 'SET_CURRENT_INDEX'export const SET_DISC = 'SET_DISC'export const SET_TOP_LIST = 'SET_TOP_LIST'export const SET_SEARCH_HISTORY = 'SET_SEARCH_HISTORY'export const SET_PLAY_HISTORY = 'SET_PLAY_HISTORY'export const SET_FAVORITE_LIST = 'SET_FAVORITE_LIST'// mutations.js// 根据mutaion-types编写具体的mutation来设置stateimport * as types from './mutation-types'const mutations = {[types.SET_SINGER](state, singer) {state.singer = singer},[types.SET_PLAYING_STATE](state, flag) {state.playing = flag},[types.SET_FULL_SCREEN](state, flag) {state.fullScreen = flag},[types.SET_PLAYLIST](state, list) {state.playlist = list},[types.SET_SEQUENCE_LIST](state, list) {state.sequenceList = list},[types.SET_PLAY_MODE](state, mode) {state.mode = mode},[types.SET_CURRENT_INDEX](state, index) {state.currentIndex = index},[types.SET_DISC](state, disc) {state.disc = disc},[types.SET_TOP_LIST](state, topList) {state.topList = topList},[types.SET_SEARCH_HISTORY](state, history) {state.searchHistory = history},[types.SET_PLAY_HISTORY](state, history) {state.playHistory = history},[types.SET_FAVORITE_LIST](state, list) {state.favoriteList = list},}export default mutations; // 导出mutations对象// getters.js// 编写getter来读取stateexport const singer = state => state.singerexport const playing = state=>state.playingexport const fullScreen = state=>state.fullScreenexport const playlist = state=>state.playlistexport const sequenceList = state=>state.sequenceListexport const mode = state=>state.modeexport const currentIndex = state=>state.currentIndexexport const currentSong = (state)=> {return state.playlist[state.currentIndex] || {};}export const disc = state=>state.discexport const topList = state=>state.topListexport const searchHistory = state=>state.searchHistoryexport const playHistory = state=>state.playHistoryexport const favoriteList = state=>state.favoriteList// actions.js// 异步操作import * as types from './mutation-types'import { playMode } from 'common/js/config'import { shuffle } from 'common/js/util'import { saveSearch, deleteSearch, clearSearch, savePlay, saveFavorite, deleteFavorite } from 'common/js/cache'function findIndex(list, song) {return list.findIndex((item) => {return item.id === song.id;})}export const selectPlay = function({ commit, state }, { list, index }) {commit(types.SET_SEQUENCE_LIST, list);if (state.mode === playMode.random) {let randomList = shuffle(list);commit(types.SET_PLAYLIST, randomList);index = findIndex(randomList, list[index]);} else {commit(types.SET_PLAYLIST, list);}commit(types.SET_CURRENT_INDEX, index);commit(types.SET_FULL_SCREEN, true);commit(types.SET_PLAYING_STATE, true);};export const randomPlay = function({ commit }, { list }) {commit(types.SET_PLAY_MODE, playMode.random);commit(types.SET_SEQUENCE_LIST, list);let randomList = shuffle(list);commit(types.SET_PLAYLIST, randomList);commit(types.SET_CURRENT_INDEX, 0);commit(types.SET_FULL_SCREEN, true);commit(types.SET_PLAYING_STATE, true);};export const insertSong = function({ commit, state }, song) {let playlist = state.playlist.slice();let sequenceList = state.sequenceList.slice();let currentIndex = state.currentIndex;// 记录当前歌曲let currentSong = playlist[currentIndex];// 修改playlist// 查询当前列表中是否有待插入的歌曲并返回其索引let fpIndex = findIndex(playlist, song);// 因为是插入歌曲,所以索引要+1currentIndex++;// 插入这首歌当当前索引位置playlist.splice(currentIndex, 0, song);// 如果已经包含这首歌曲if (fpIndex > -1) {// 如果当前插入的索引大于列表中的序号if (currentIndex > fpIndex) {playlist.splice(fpIndex, 1);currentIndex--;} else {playlist.splice(fpIndex + 1, 1);}}// 修改sequenceListlet currentSIndex = findIndex(sequenceList, currentSong) + 1;let fsIndex = findIndex(sequenceList, song);sequenceList.splice(currentSIndex, 0, song);if (fsIndex > -1) {if (currentSIndex > fsIndex) {sequenceList.splice(fsIndex, 1);} else {sequenceList.splice(fsIndex + 1, 1);}}commit(types.SET_PLAYLIST, playlist);commit(types.SET_SEQUENCE_LIST, sequenceList);commit(types.SET_CURRENT_INDEX, currentIndex);commit(types.SET_FULL_SCREEN, true);commit(types.SET_PLAYING_STATE, true);};export const saveSearchHistory = function({ commit }, query) {commit(types.SET_SEARCH_HISTORY, saveSearch(query));};export const deleteSearchHistory = function({ commit }, query) {commit(types.SET_SEARCH_HISTORY, deleteSearch(query));};export const clearSearchHistory = function({ commit }) {commit(types.SET_SEARCH_HISTORY, clearSearch());};export const deleteSong = function({ commit, state }, song) {let playlist = state.playlist.slice()let sequenceList = state.sequenceList.slice()let currentIndex = state.currentIndexlet pIndex = findIndex(playlist, song)playlist.splice(pIndex, 1)let sIndex = findIndex(sequenceList, song)sequenceList.splice(sIndex, 1)if (currentIndex > pIndex || currentIndex === playlist.length) {currentIndex--}commit(types.SET_PLAYLIST, playlist)commit(types.SET_SEQUENCE_LIST, sequenceList)commit(types.SET_CURRENT_INDEX, currentIndex)if (!playlist.length) {commit(types.SET_PLAYING_STATE, false)} else {commit(types.SET_PLAYING_STATE, true)}}export const deleteSongList = function({ commit }) {commit(types.SET_CURRENT_INDEX, -1)commit(types.SET_PLAYLIST, [])commit(types.SET_SEQUENCE_LIST, [])commit(types.SET_PLAYING_STATE, false)}export const savePlayHistory = function({ commit }, song) {commit(types.SET_PLAY_HISTORY, savePlay(song))}export const saveFavoriteList = function({ commit }, song) {commit(types.SET_FAVORITE_LIST, saveFavorite(song))}export const deleteFavoriteList = function({ commit }, song) {commit(types.SET_FAVORITE_LIST, deleteFavorite(song))}// index.js// 入口文件,实例化vueximport Vue from 'vue'import Vuex from 'vuex'import * as actions from './actions'import * as getters from './getters'import state from './state'import mutations from './mutations'import createLogger from 'vuex/dist/logger';// 调试工具,可以打印出logVue.use(Vuex);// vuex是个插件,需要useconst debug = process.env.NODE_ENV !== 'production';// 导出一个store实例,供main.js使用export default new Vuex.Store({actions,getters,state,mutations,strict: debug,// strict模式会针对不通过commit提交mutation报错plugins: debug ? [createLogger()] : [],// 使用打印log插件})// main.js// 导入vuex的stroe实例,并注入到vue根组件中import store from './store'...new Vue({el: '#app',router,store,// 导入vuex的stroe实例render: h => h(App)});